Step 1: Create the access key
1. Login to Google Workspace Admin account and navigate to Google developers console.
Http link: https://console.developers.google.com
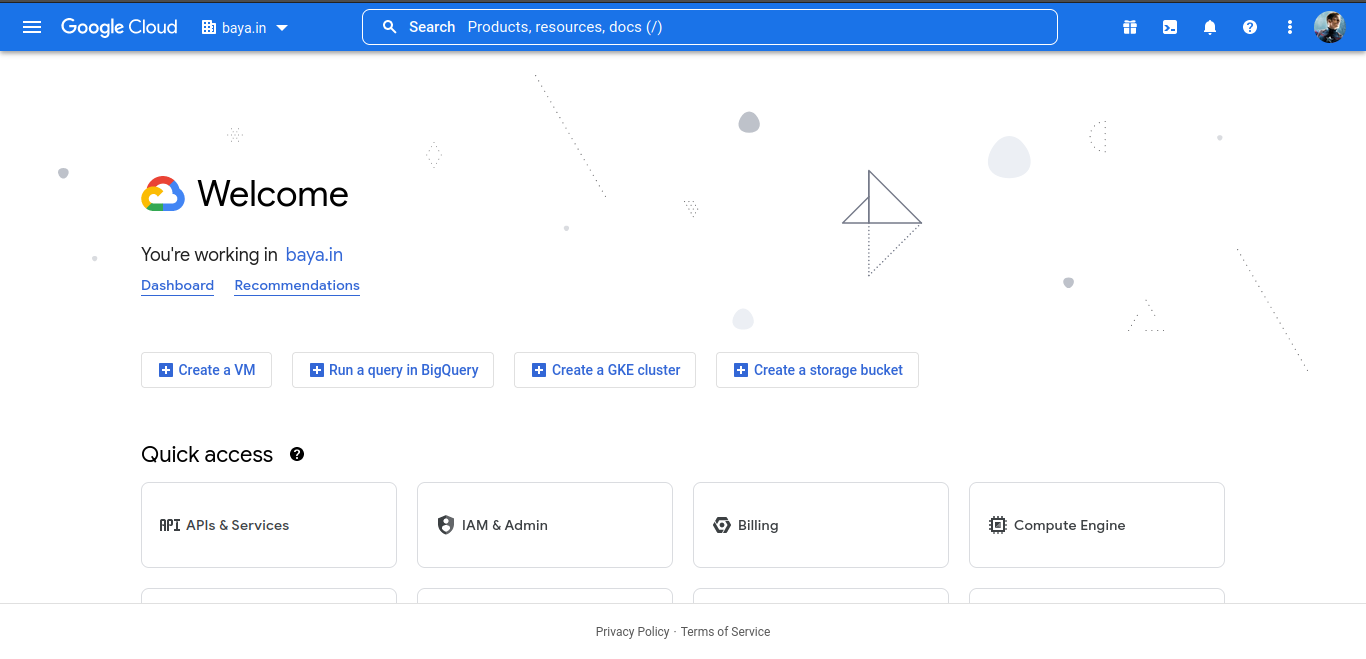
a. Select top left panel.
b. Select IAM & Admin.
c. Select Service Accounts.
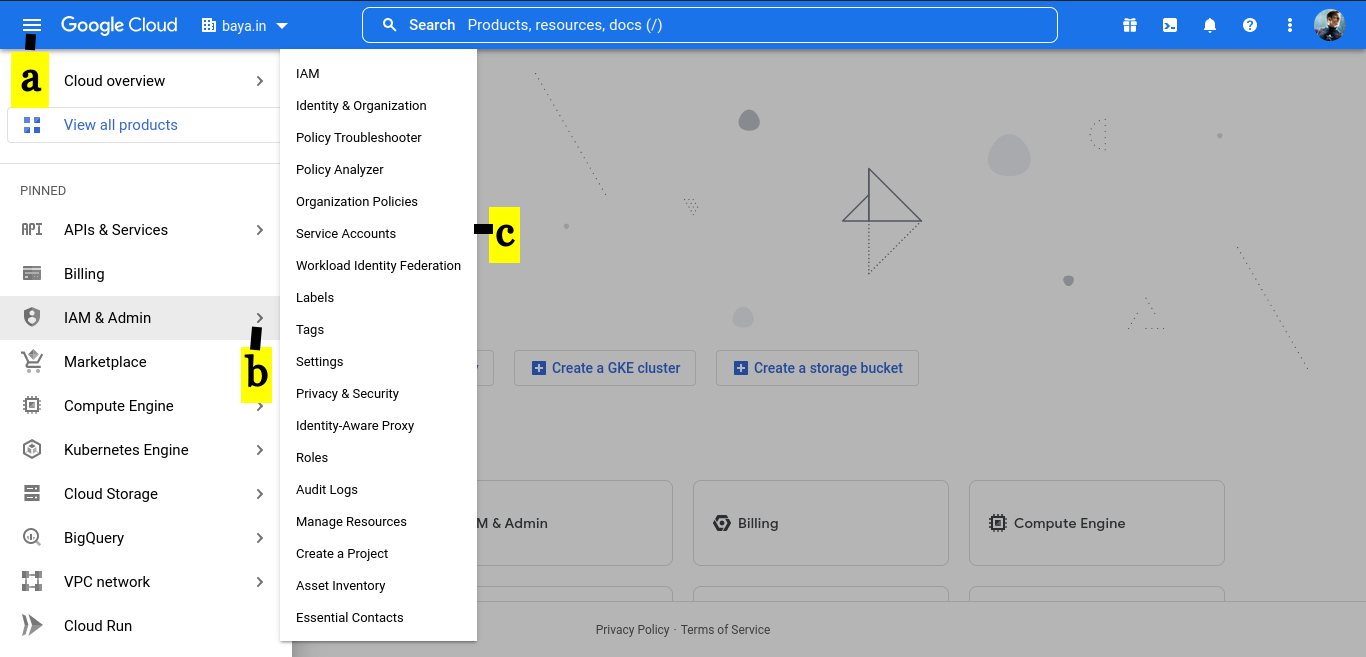
2. CREATE A PROJECT
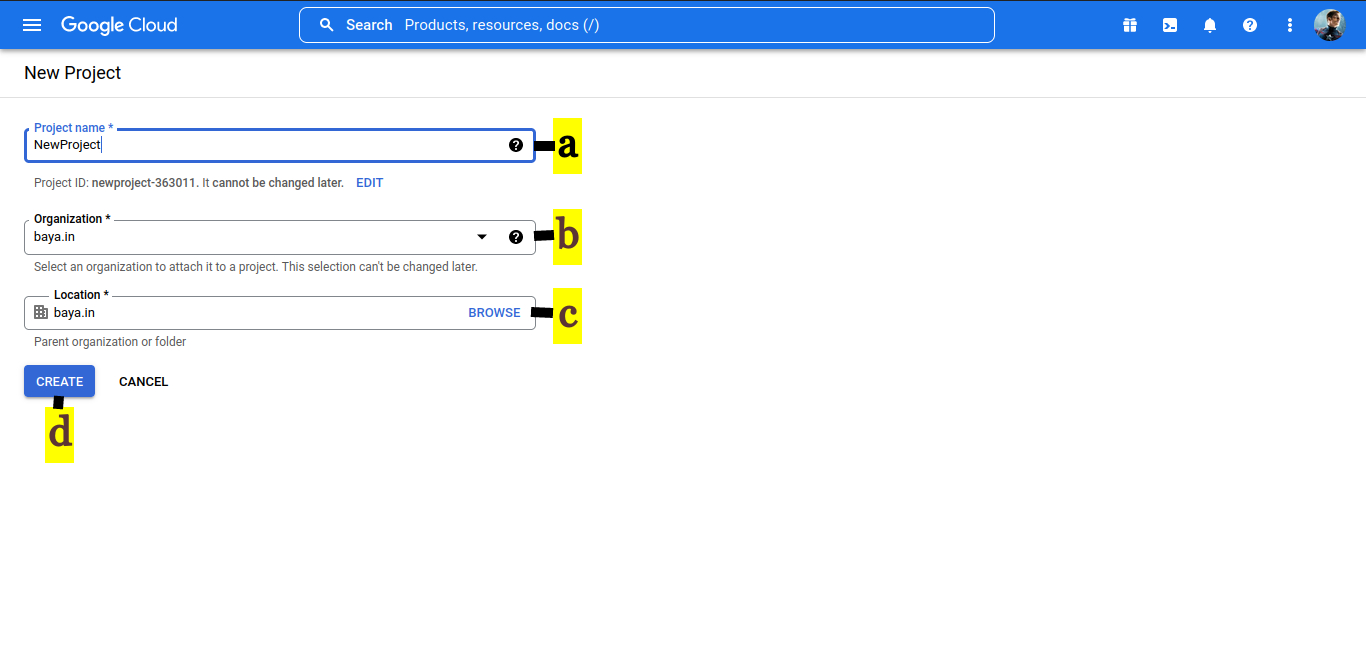
a. Provide Project name.
b. Select the Organization.
c. Browse for the Location.
d. Click on CREATE.
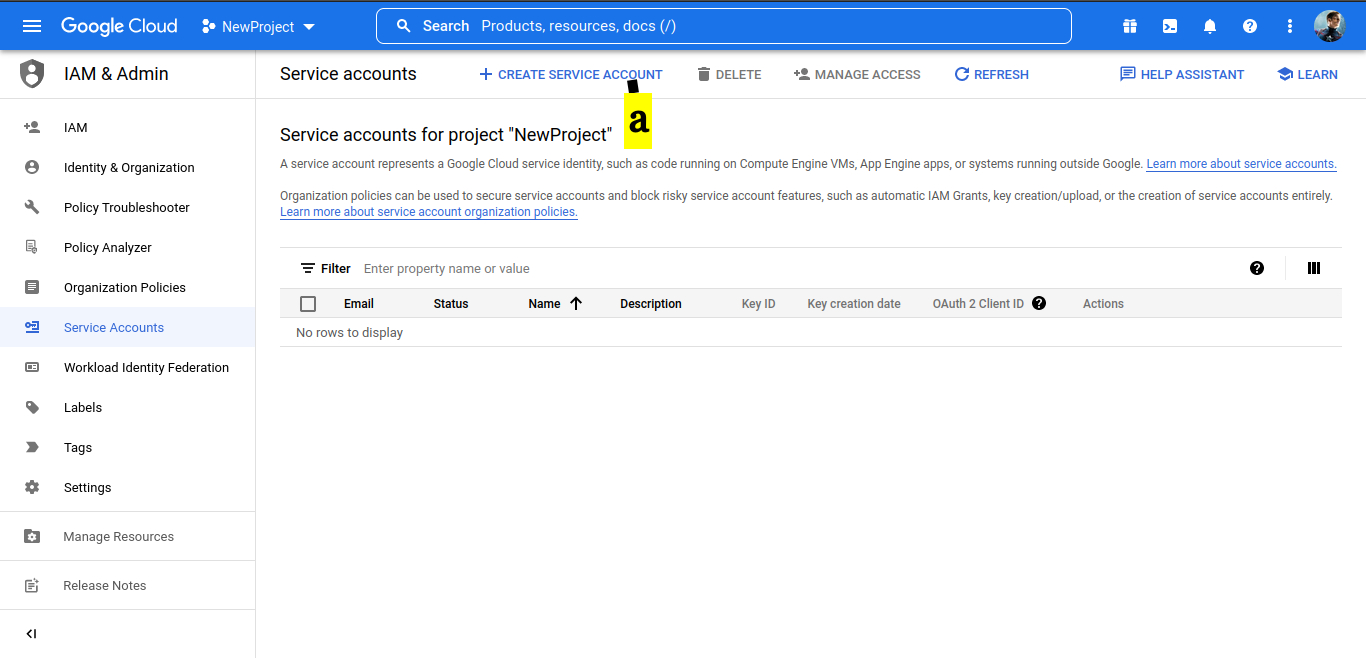
3. Create a service account
a. Click CREATE SERVICE ACCOUNT.
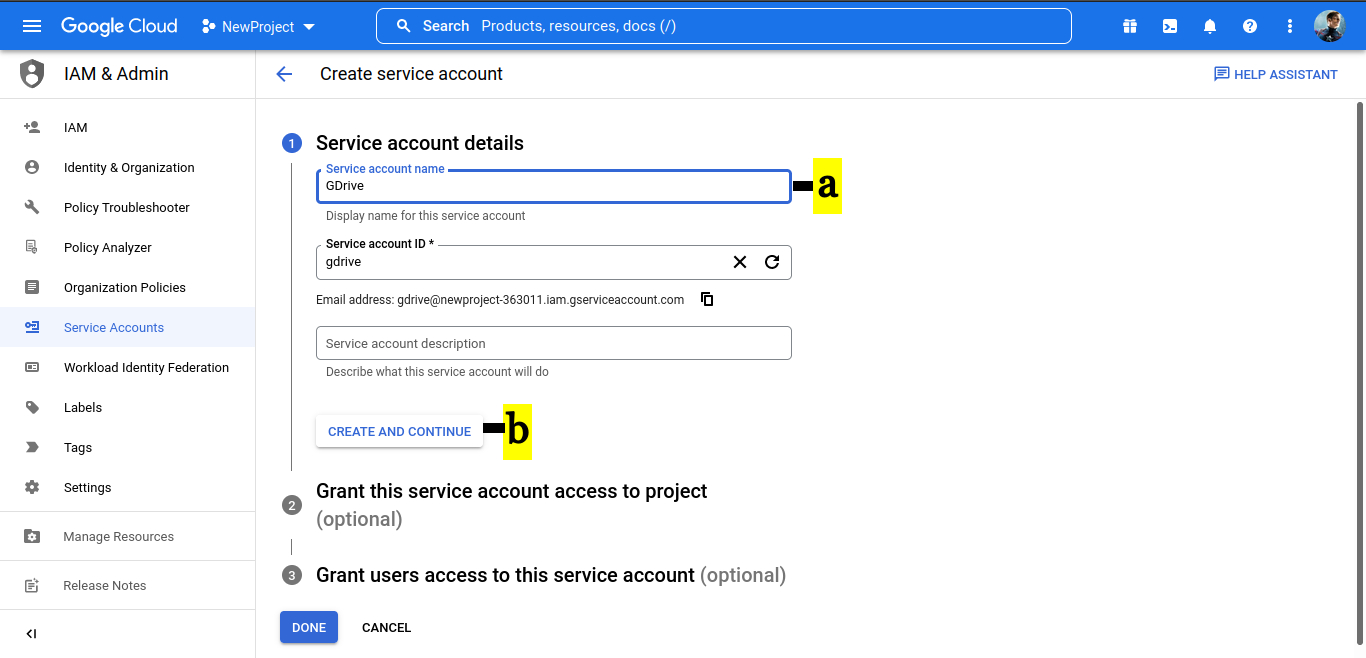
4. On the service account details window.
a. Provide Service account name.
b. Click on CREATE AND CONTINUE
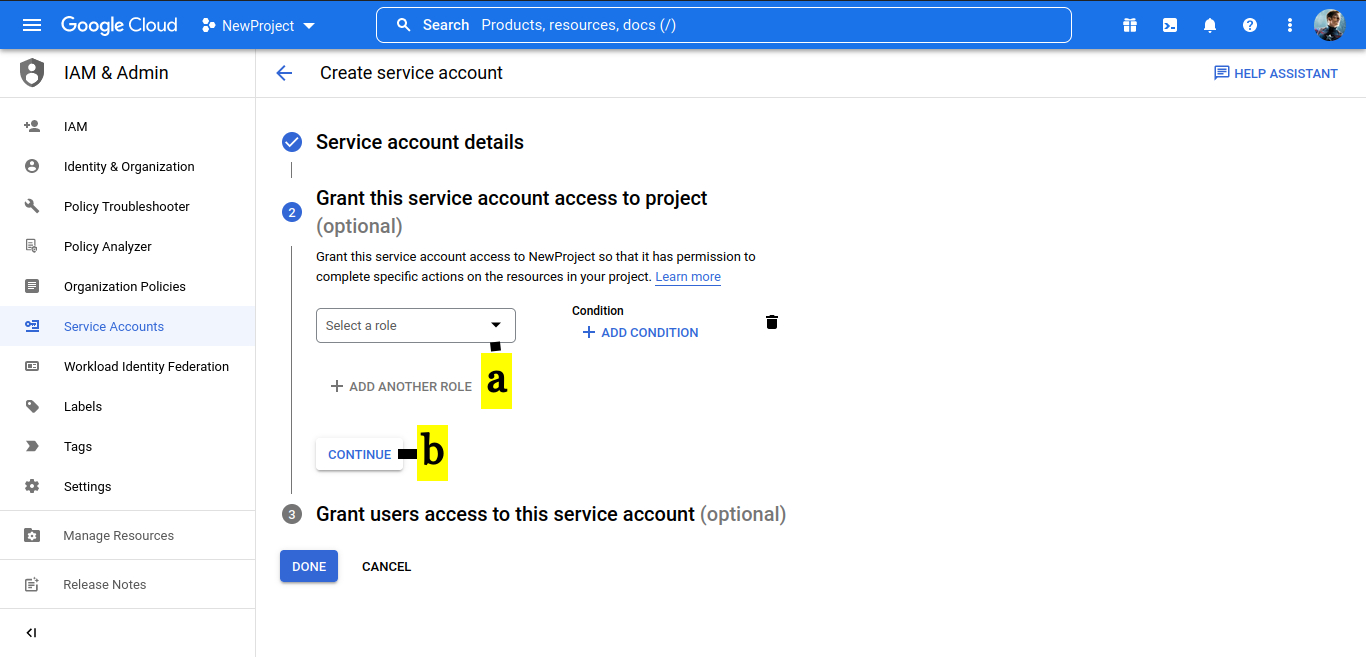
5. Grant this service account access to project.
a. Select a role (Basic -> Owner)
b. Click on CONTINUE
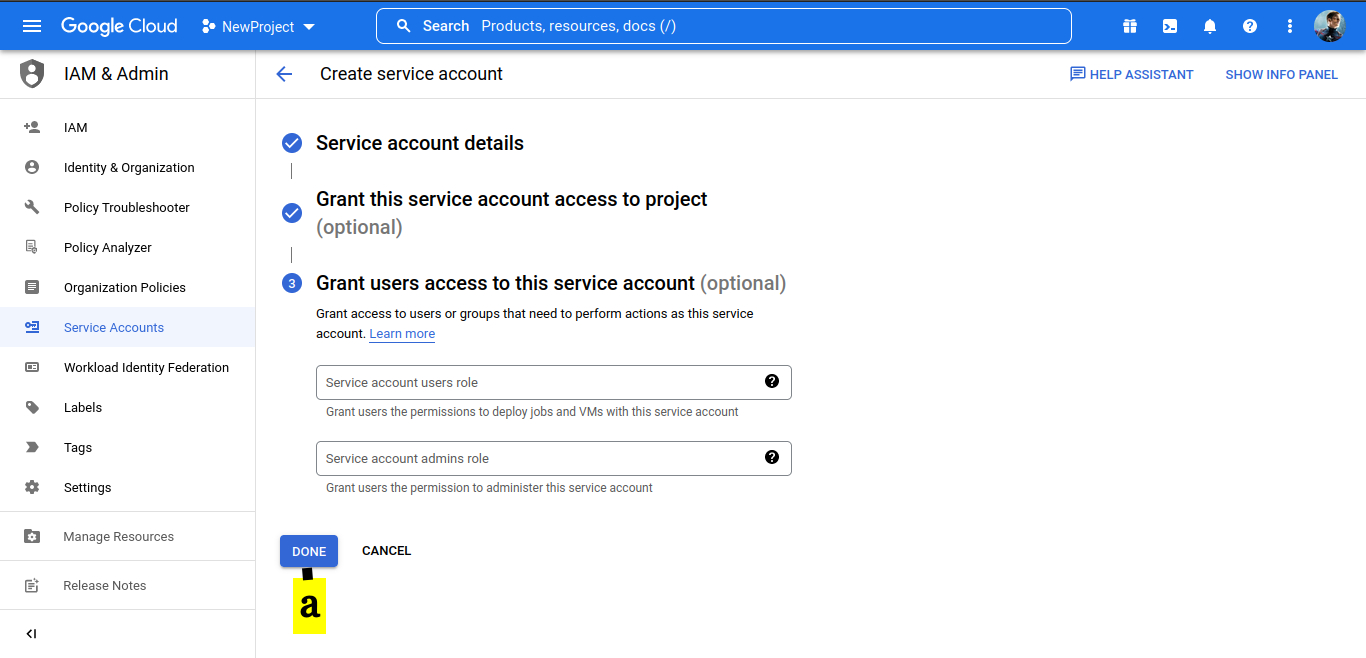
6. Grant users access to this service account (optional)
a. Keep the defaults and click on DONE
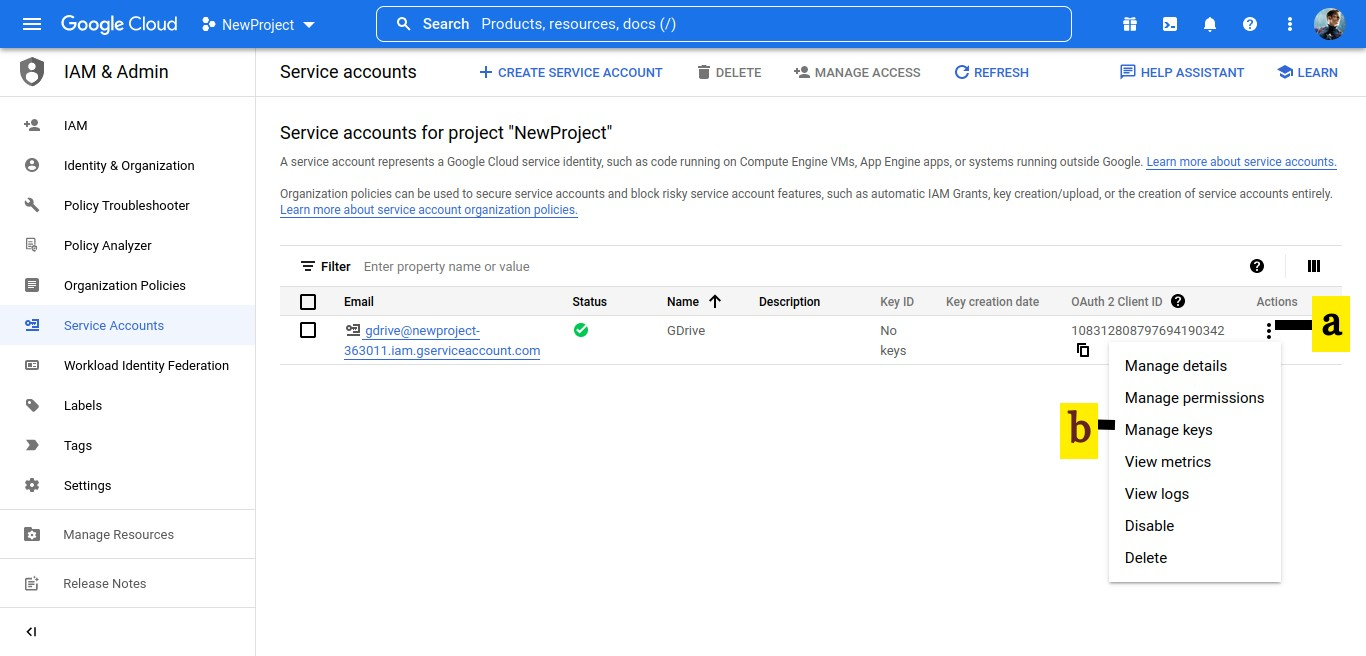
7. On service account window.
a. Click on Action button denoted by the three vertical dots
b. Select Manage Keys
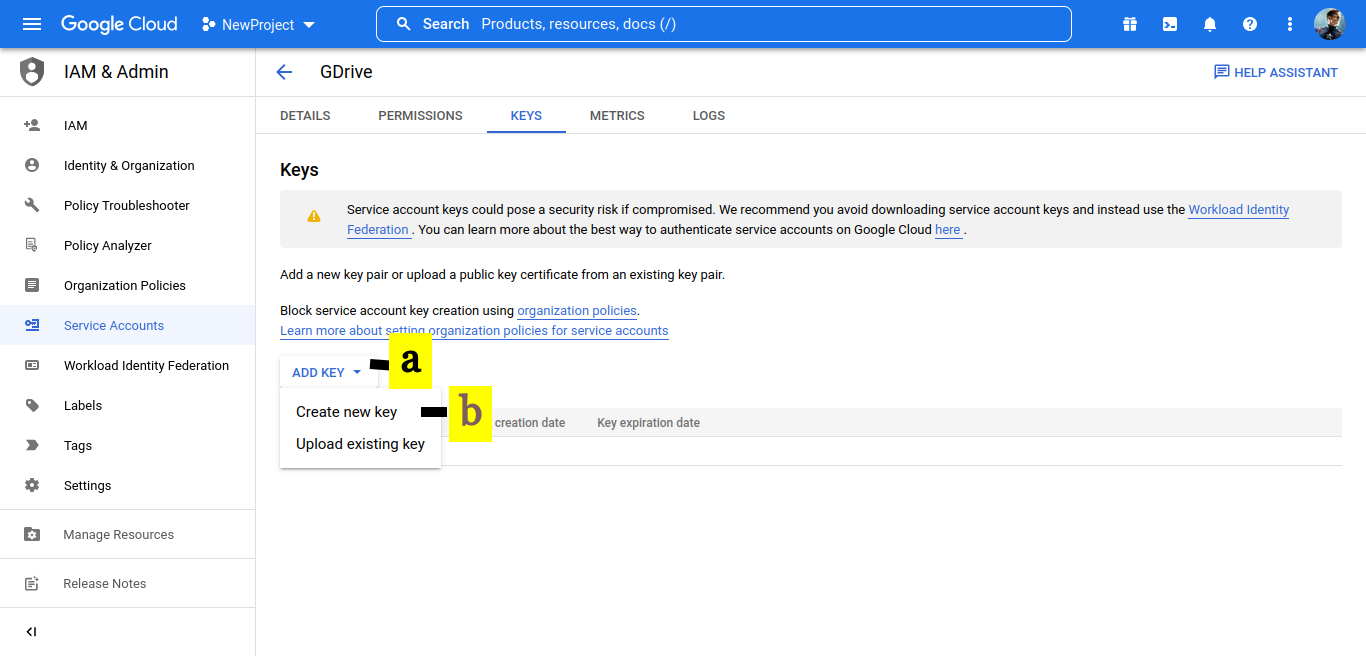
8. Create a key
a. Drop down ADD KEY
b. Select Create new key
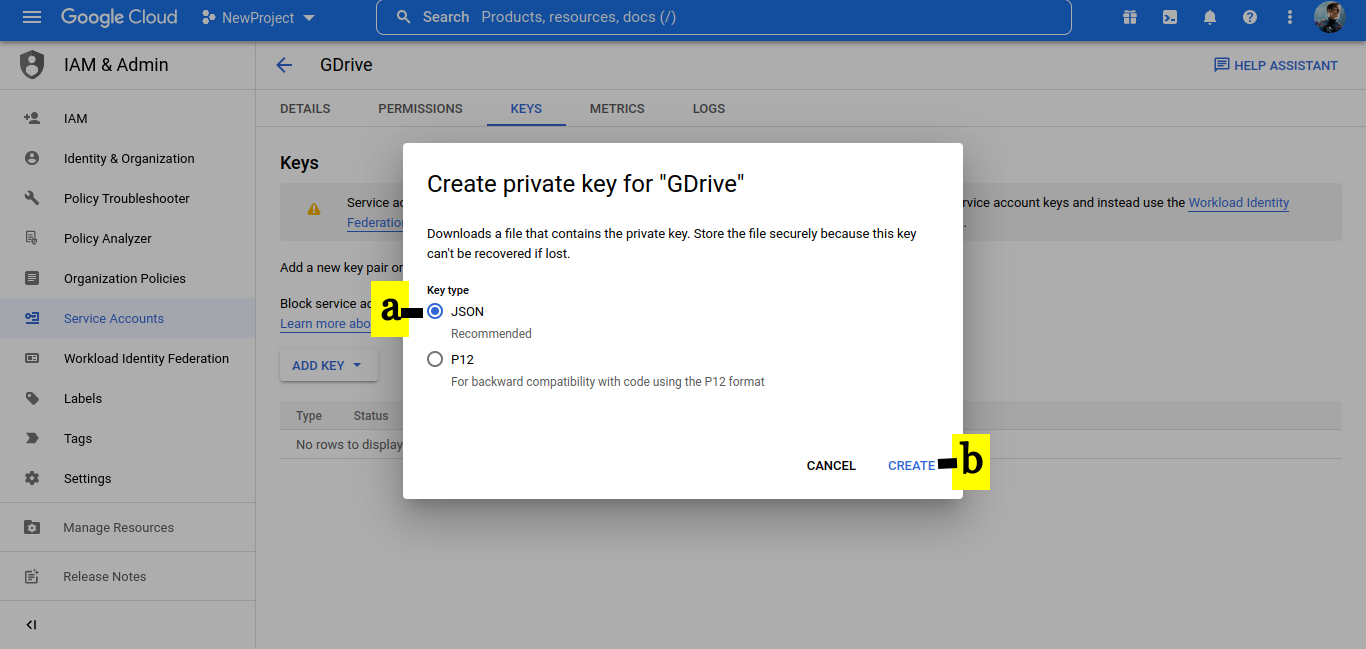
9. In Create private key.
a. Select JSON
b. Click on CREATE. On creation, the key will be downloaded to your desktop. This will be required in Step 4
- IMPORTANT NOTE: If you are unable to generate a key, then follow the steps given here.
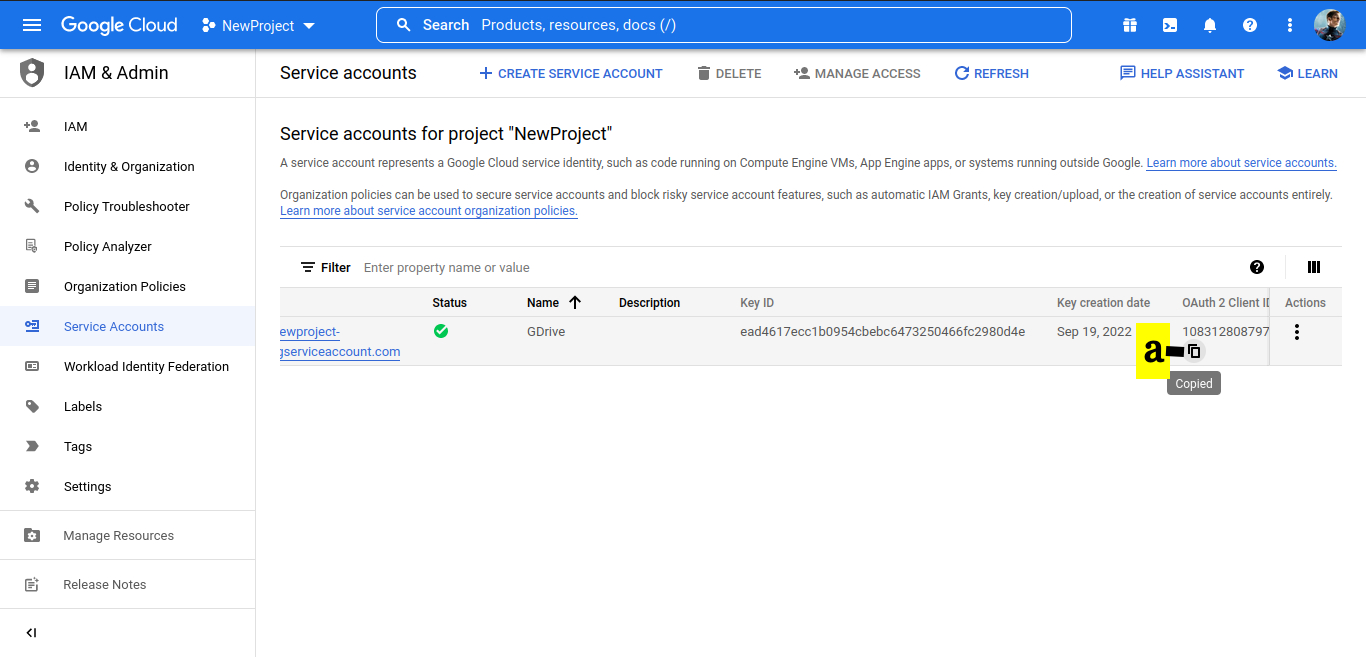
10. Copy OAuth 2 Client ID - this will be required in step 3
a. On copying the key, you will see the message Copied
Step 2: Enable the API Services
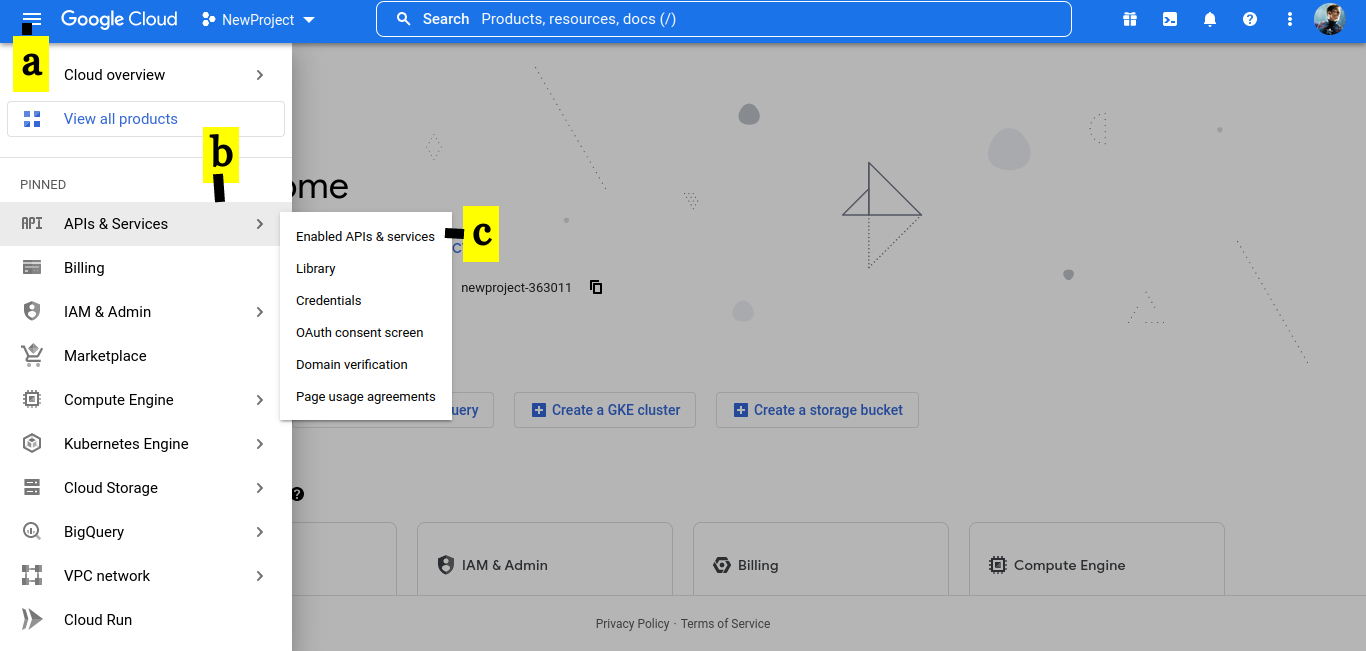
1. Enable API Services
a. Click on top left panel
b. Select APIs & Services
c. Click on Enabled APIs & services
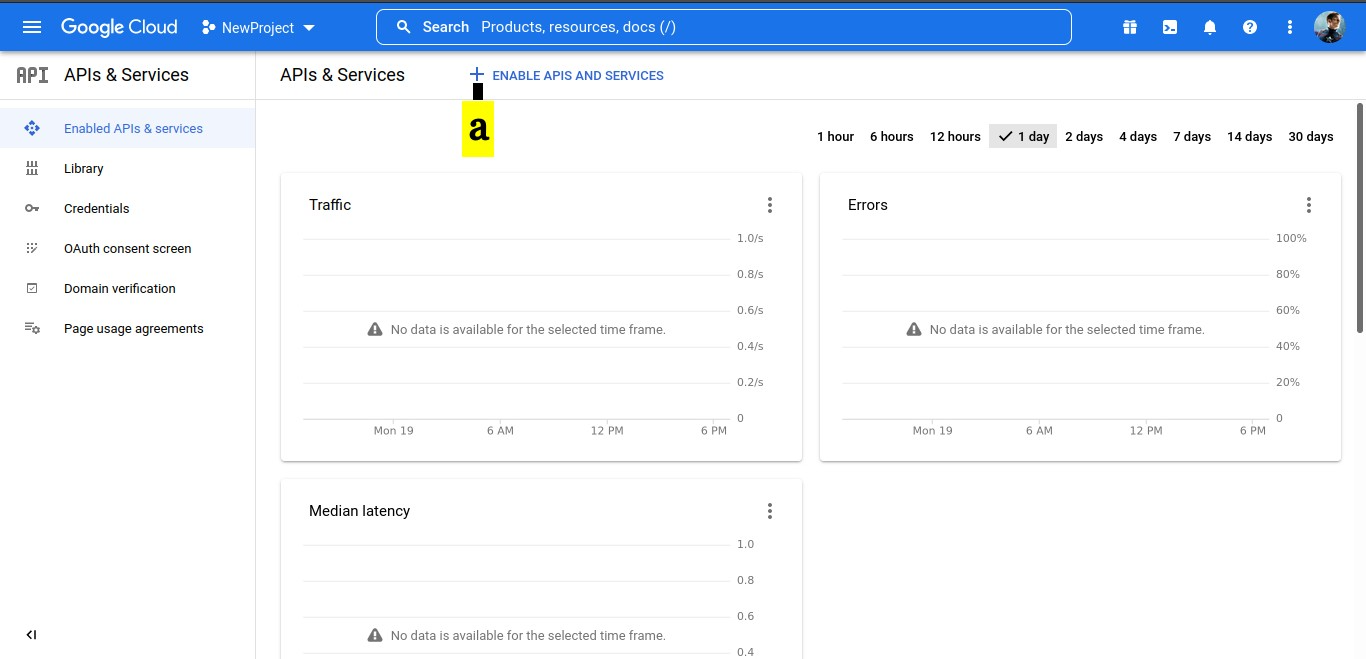
2. In the APIs & Services console
a. Click on ENABLE APIS AND SERVICES
3. In the API Library,
b. search for the required APIs
c. Enable the API.
The table below gives the list of API required to be enabled for different data source
| Data source | API | Screenshots |
|---|---|---|
| Drive Data For: 1. User's data in drive 2. Google Chat data | Google Drive API |   |
| Mailbox data For user's mailbox | GMail API |   |
| Directory Data For 1. Distrubution List members Required for scheduler 2. Google Chat Data 3. Mailbox size | Admin SDK API |   |
| Google Chat Data | Google Chat API |
IMPORTANT NOTE: In addition to Enabling the Google Chat API, you have to update the configuration as given here. |
Step 3: Enable domain-wide delegation
Login to G-suite Admin account and navigate to Google Admin.
Http link: https://admin.google.com
a. Click on Security
b. Select on Access and data control
c. Click on API controls
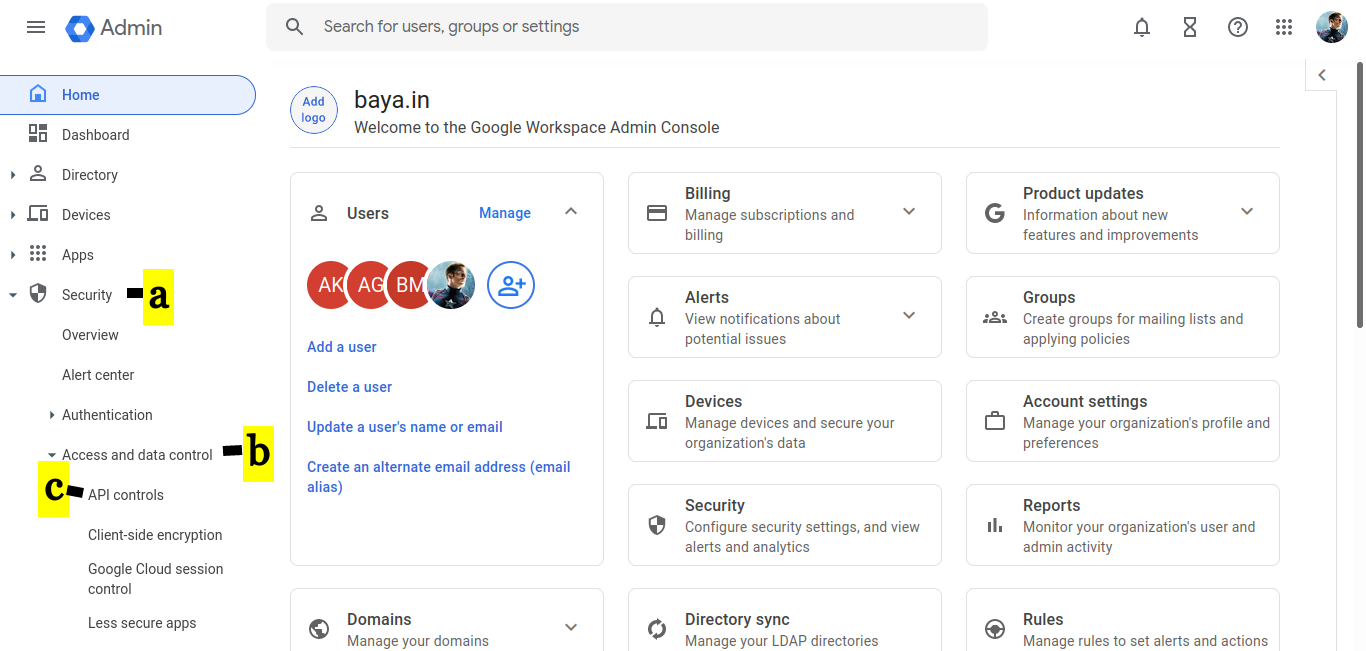
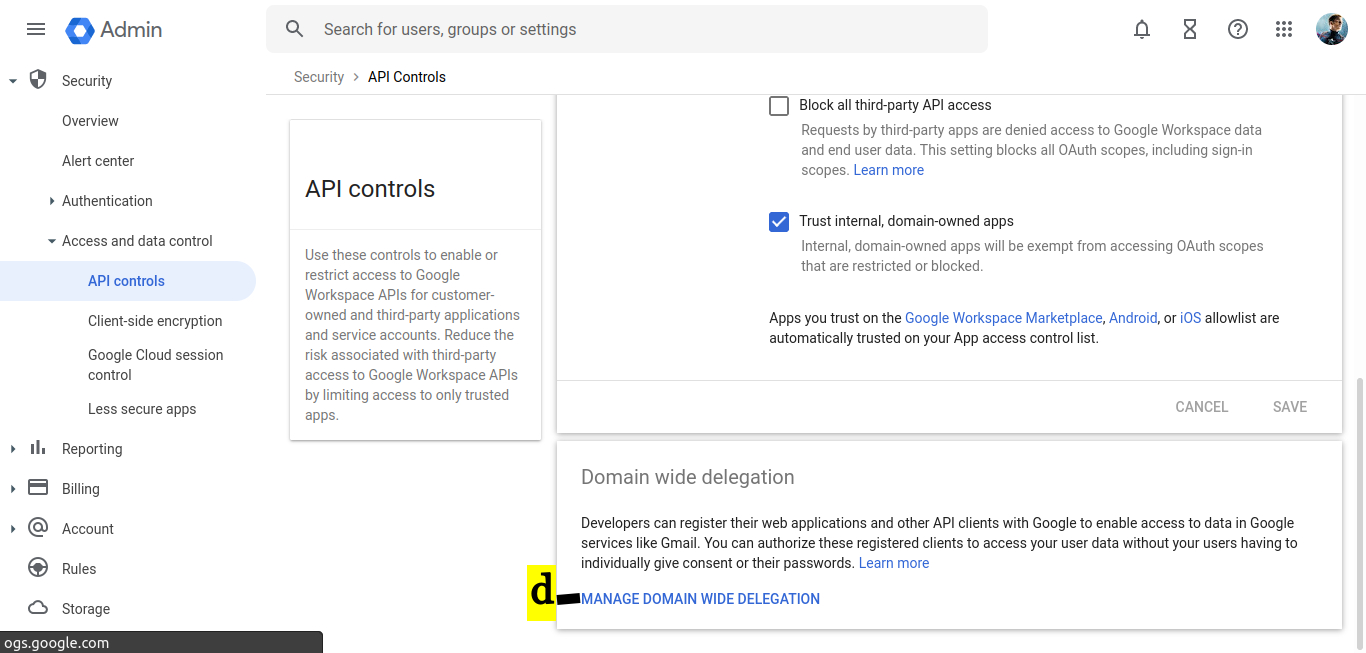
d. Click On MANAGE DOMAIN WIDE DELEGATION
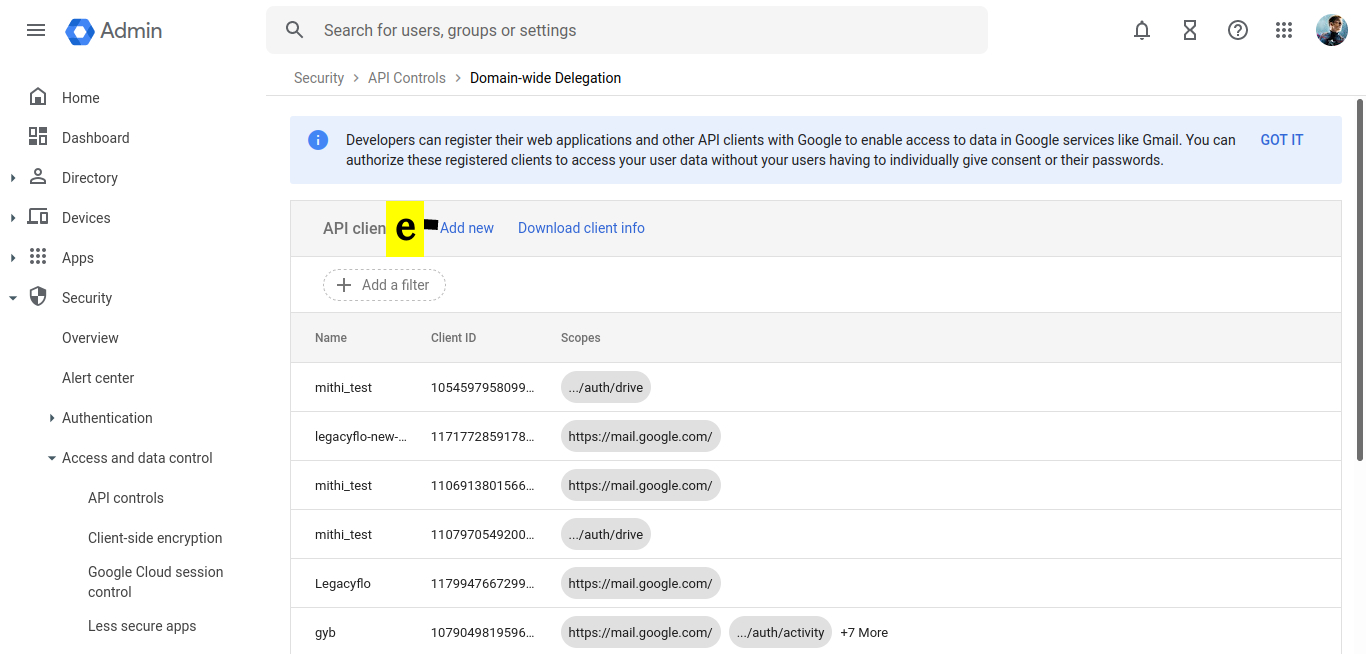
e. Click on Add new
f. Paste the Client ID which you copied earlier
g. In OAuth scopes (comma-delimited), provide the string for the relevant API
h. Click the AUTHORIZE button
| GDrive API | https://www.googleapis.com/auth/drive (Required if you want to access data in any user's drive AND if you want to archive Google Chat transcripts ) |  |
| Admin SDK API | https://www.googleapis.com/auth/admin.directory.group.readonly (Required if you want to use Distribution List ID in the LegacyFlo Scheduler) https://www.googleapis.com/auth/admin.directory.user.readonly (Required if you want to archive Google Chat transcripts) https://www.googleapis.com/auth/admin.reports.usage.readonly (Required to calculate mailbox size for mailbox data migration) |  |
| Gmail API | https://mail.google.com/ (Required if you want to access data in any user's mailbox ) |  |
| Google Chat API | https://www.googleapis.com/auth/chat.spaces.readonly https://www.googleapis.com/auth/chat.messages.readonly https://www.googleapis.com/auth/chat.memberships.readonly (Required if you want to access Google Chat transcripts) |  |
This completes the process of enabling the domain-wide delegation for GSuite for the required API
Step 4: Register with LegacyFlo
When you generated the key, it was downloaded to your desktop as a JSON file. This key has to be registered with LegacyFlo.
- Login into LegacyFlo
- From the menu on the left side, click on the Profile icon at the bottom
- On the pop-up menu, select Google Workspace integrations
- If you have an access key for GMail, select Gmail. If you have an access key for GDrive, select GDrive
- To register the access key for a new domain, click on the + sign next to Register Key for the domain
- Your user id, Client App, and Resource Owner fields will be pre-filled. Enter the domain name for which the key is to be registered
- Enter the Google Workspace Admin ID for which the key was registered.
- Choose the JSON file which has been downloaded to your desktop.
- Click on Save
- Close the dialog box.
- To update the key for a domain, click on the edit icon next to the domain name and chose the new JSON file

