Configure an IMAP email account in Thunderbird
Step 1: Create new account
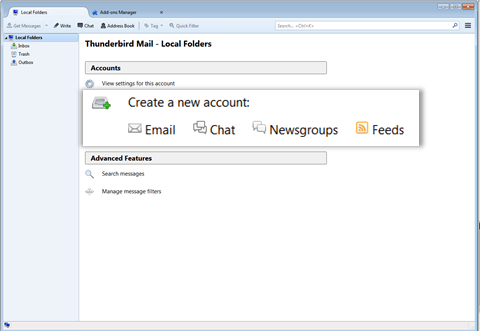
- Launch the Thunderbird desktop client.
- On the left hand side pane, click the Local Folders option. The right hand side pane will display options to edit accounts and configure advanced features.
- Under the Create a new account, click the Email option.

Step 2: Provide account information
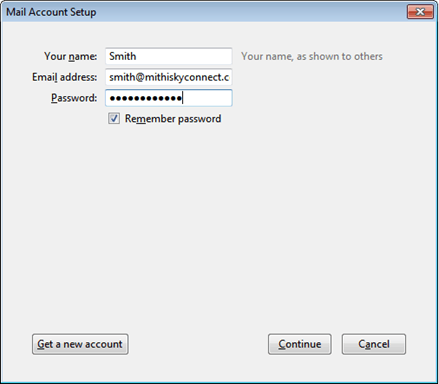
- On the Mail Account Setup box,
- Provide User id and Password of the account
- Click the Continue button
- Using Mithi SkyConnect trial account? Use the User Id and the Password received in the Welcome Mail sent by the Mithi team.
- Thunderbird looks up for the information provided and enables the Manual Configuration button once the look up process is over.

- Choose the IMAP option and click the Manual Configuration button to proceed.
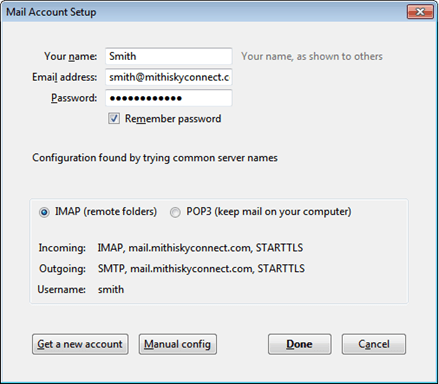
- On the Mail Account Setup box,


Step 3: Provide Incoming and Outgoing server settings
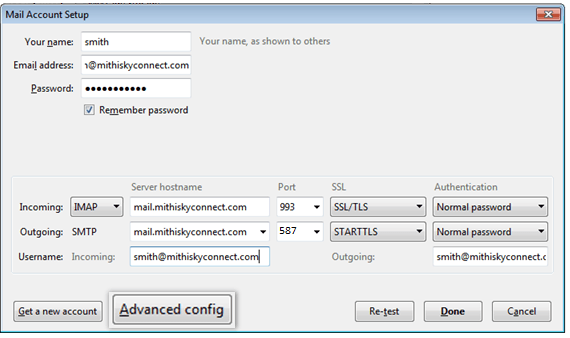
- On the Mail Account Setup dialog box,In the Incoming row,
- Choose the IMAP option
- Enter the Server Name of your server
- Don't know your server name? Access the online help to know the server settings required to configure your account.
- Choose the SSL/TLS as the SSL option
- Choose 993 as the Port for connection
- Choose the Normal Password option as the type of Authentication required
- In the Outgoing row,
- Choose the SMTP option
- Enter the Server Name of your server
- Don't know your server name? Access the online help to know the server settings required to configure your account.
- Choose the STARTTLS as the SSL option
- Choose 587 as the Port for connection
- Choose the Normal Password option as the type of Authentication required

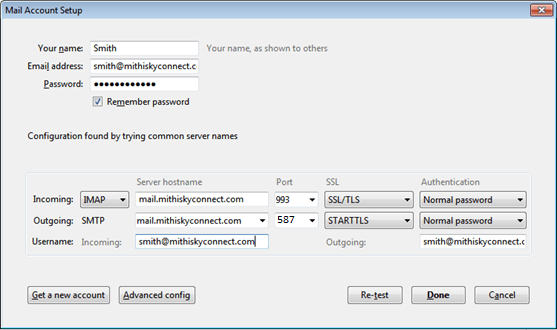
- Click the Advanced config button.

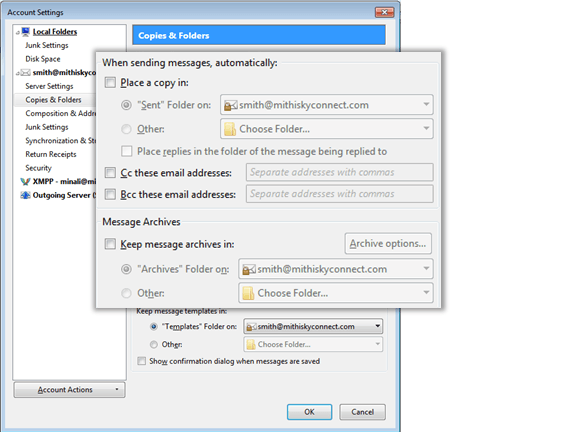
- On the left pane, click the Copies & Folders option.

- Under the When sending messages automatically section, deselect the Place a copy in check-box, to disable the setting to save a copy of an email sent to local folder on your machine.
- Under the Message Archives section, deselect the Keep message archives in check-box. Click the Ok button to configure the account.
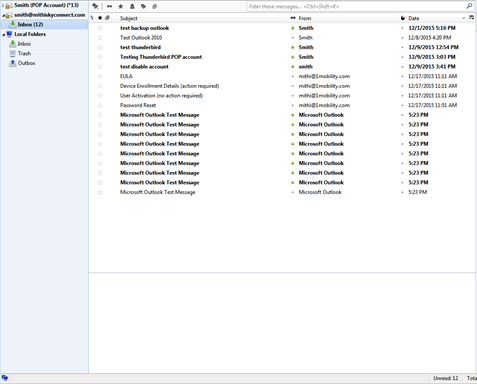
- Thunderbird configures your account and displays the Inbox folder which holds all the mail received to your mailbox. You can find a copy of an email sent in the Sent Items folder of the desktop client which syncs automatically on the server.
- On the Mail Account Setup dialog box,In the Incoming row,


Configure a POP email account in Thunderbird
Before configuring a POP type of account understand the Difference between POP and IMAP type of account.
Step 1: Create new account
- Launch the Thunderbird desktop client.
- On the left hand side pane, click the Local Folders option. The right hand side pane will display options to edit accounts and configure advanced features.
- Under the Create a new account, click the Email option.
Step 2: Provide account information
- On the Mail Account Setup box,
- Provide User id and Password of the account
- Click the Continue button
- Using Mithi SkyConnect trial account? Use the User Id and the Password received in the Welcome Mail sent by the Mithi team.

- Thunderbird looks up for the information provided and enables the Manual Configuration button once the look up process is over.

- Choose the POP option and click the Manual Configuration button to proceed.
- On the Mail Account Setup box,


Step 3: Provide Incoming and Outgoing server settings
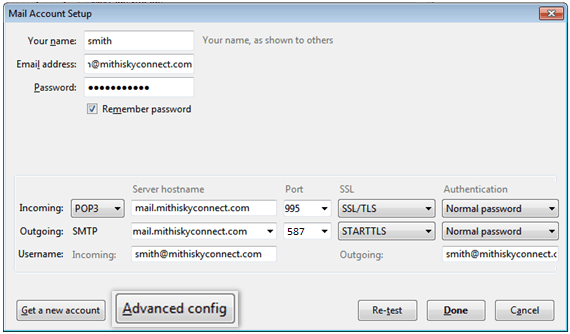
- On the Mail Account Setup dialog box,In the Incoming row,
- Choose the POP option
- Enter the Server Name of your server
- Don't know your server name? Access the online help to know the server settings required to configure your account.
- Choose the SSL/TLS as the SSL option
- Choose 995 as the Port for connection
- Choose the Normal Password option as the type of Authentication required
- In the Outgoing row,
- Choose the SMTP option
- Enter the Server Name of your server
- Don't know your server name? Access the online help to know the server settings required to configure your account.
- Choose the STARTTLS as the SSL option
- Choose 587 as the Port for connection
- Choose the Normal Password option as the type of Authentication required
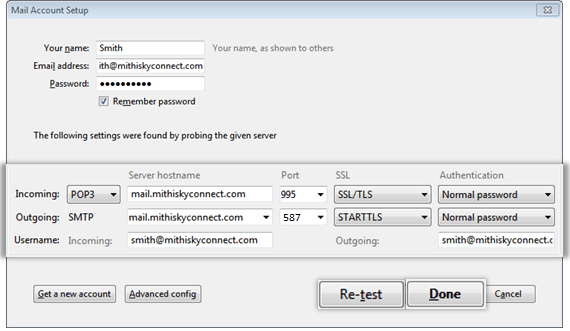

- Click the Advanced config button.

- On the left pane, click the Copies & Folders option.

- Thunderbird configures your account and displays the Inbox folder which holds all the mail received to your mailbox. You can find a copy of an email sent in the Sent Items folder of the desktop client which syncs automatically on the server.

- On the Mail Account Setup dialog box,In the Incoming row,


Manage your email account configured in Thunderbird
Subscribing IMAP Folders in Thunderbird
If you have configured an IMAP type of account, you can subscribe to access the IMAP folders on the server which includes Sent Items, Drafts, and other personal folders on the server. When you subscribe these folders then you can view and modify the content of these folders. Following steps describe you how to subscribe the folders.
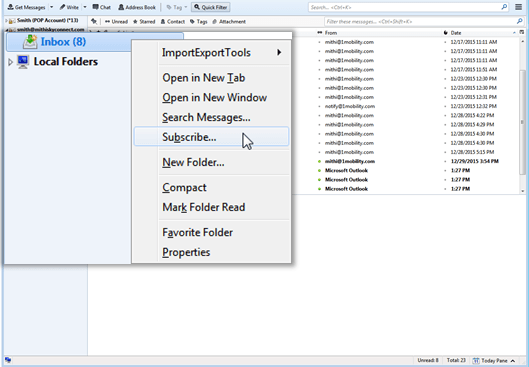
- On the left pane of Thunderbird user interface, right click the Inbox folder. Pop-up menu displays on the screen. Select the Subscribe menu item.
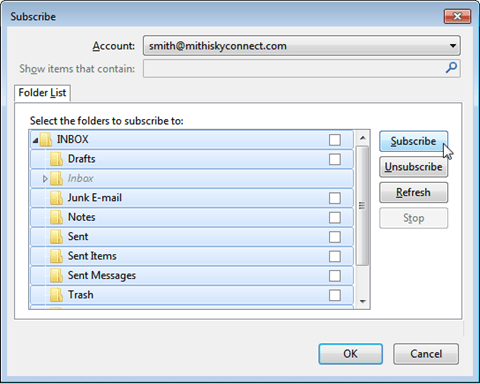
- Select all the/required folders from the list. Click the Subscribe button to proceed.
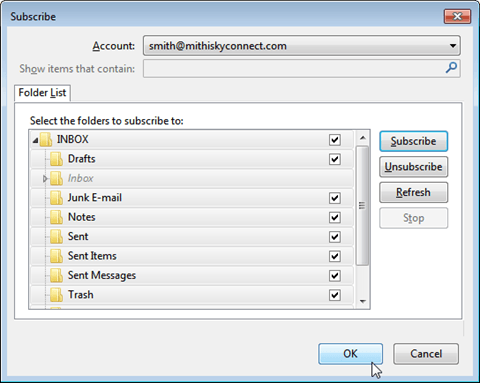
- Click the Ok button to finish the subscription process.


Import eml file in Thunderbird
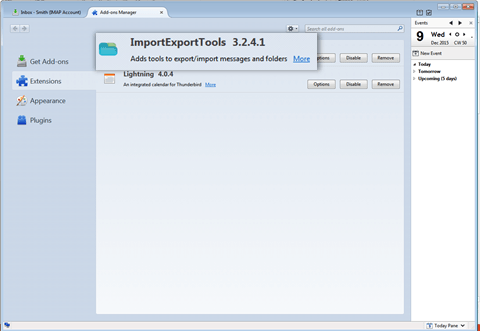
You can import the saved eml file to your Thunderbird account. To import the eml file to your Thunderbird account, you need to install the ImportExportTools Add On to the Thunderbird. On successful addition, the ImportExportTools option appears under Tools menu and the right-click menu of the folder present in the folder list.
- Create a folder to save the eml files. For example : MailImportedFromGmailAccount
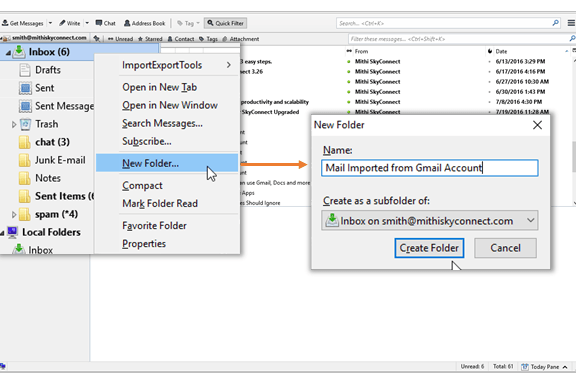
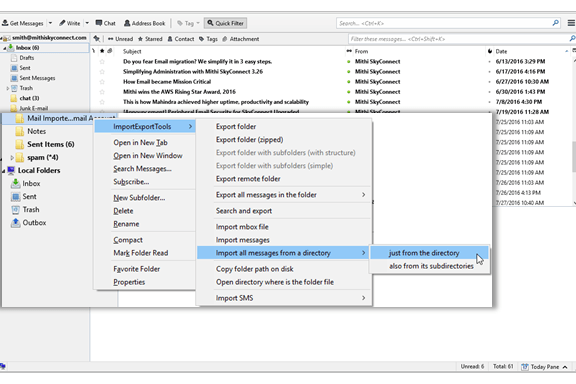
- Right-click the newly created folder. Here it is the MailImportedFromGmailAccount folder.
- Choose the menu item ImportExportTools > Import all messages from a directory just from the directory.
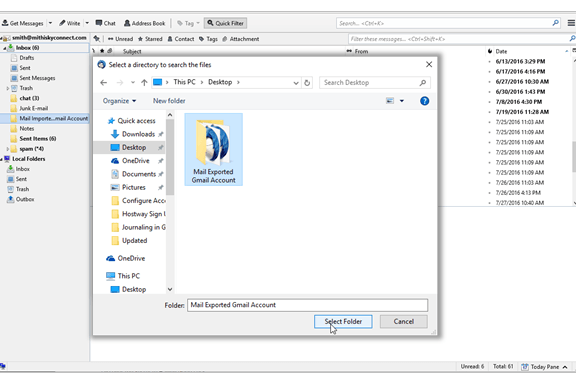
- Locate the eml files folder on your desktop.
- Select all the folders from the directory.
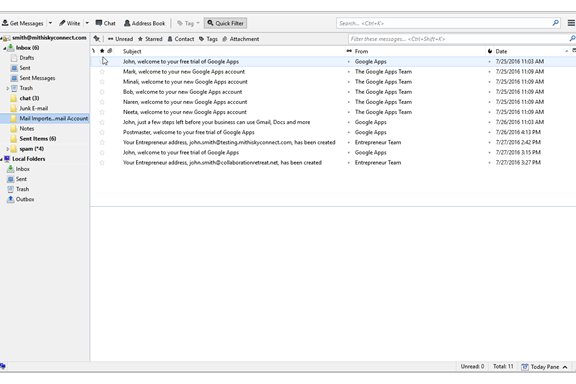
- All the messages will be imported with the folder structure under the MailImportedFromGmailAccount folder.


Take a back up of your account
It is a good practice to take a back up of your mailbox. Also, before converting your POP account to IMAP, it is recommended to take backup of your mailbox or only important folders like Sent Items.
Advantages of taking backup,
- You will always have a copy of all the important messages if something goes wrong while converting your account to IMAP.
- By keeping the backup of the data file on your desktop, you will minimize the storage required on the server.
To have backup of your mail account in Thunderbird, you can export your email and mail folders from Thunderbird as mbox file. Import this mbox file in one go onto a different computer or into another mail profile. The mbox file can only be opened within Thunderbird; other programs will not be able to open a mbox file.
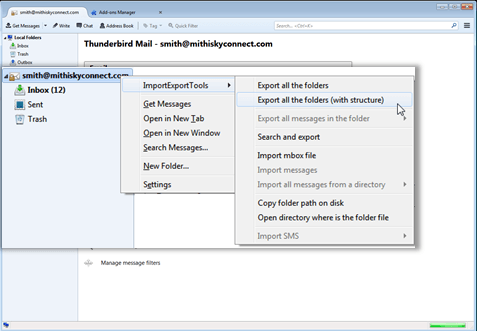
Steps to backup your account in Thunderbird
- Install the ImportExportTools Extension in Thunderbird to take the back-up of your account.
- On the left pane, right-click the Inbox folder.
- Choose the menu item ImportExportTools > Export folder with subfolders (with structure) option.
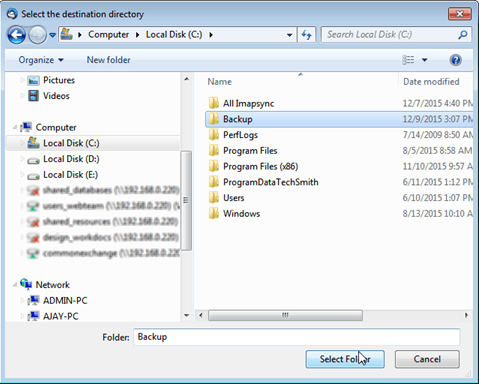
- Save the exported mbox file on your desktop or a folder on your machine. You can export all the remaining IMAP folders to the backup folder.


Set your default email account for sending new email
Refer to the steps mentioned here to set your default email account for sending new email