Configure an IMAP email account in Outlook 2013
Step 1: Create an email account
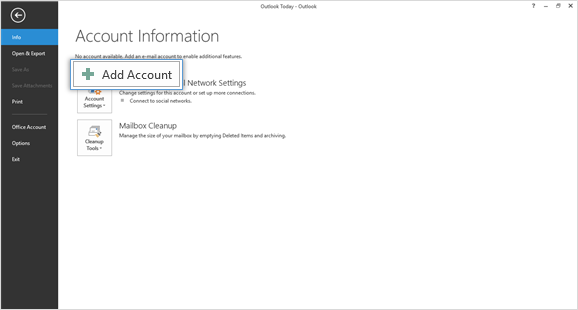
- Start Outlook.
- On the File menu, choose the Info tab and click the Add Account button.
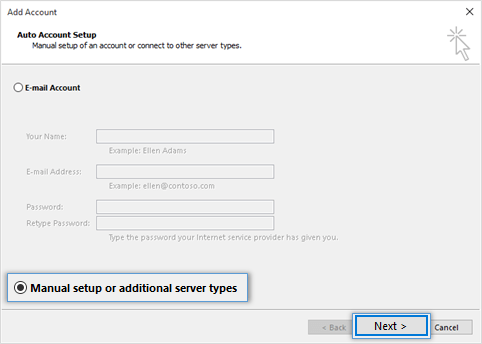
- Choose the Manual setup or additional server types option to provide custom settings. Click Next to continue.
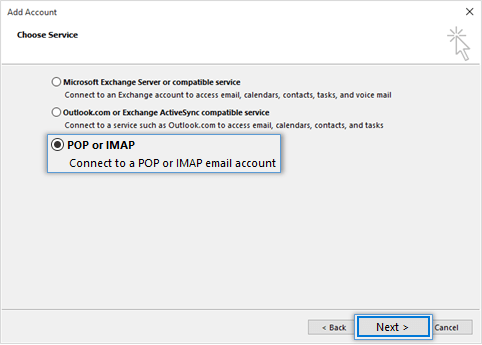
- Choose the POP or IMAP option as the type of account to be configured.


Step 2: Provide Account Details
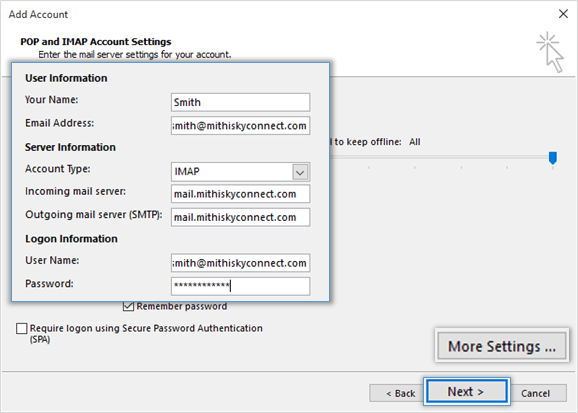
- In the User Information section, provide below details.
- In the Your Name box, enter your name exactly as you want it to appear to recipients.
- In the E-mail Address box, type your e-mail address.
- In the Server Information section,
- Select IMAP for Account Type.
- In the Incoming mail server box, type the name of your Server.
-
Don't know your server name? Access the online help to know the server settings required to configure your account.
- In the Outgoing mail server (SMTP) box, type the name of your Outgoing/SMTP server.
- In the Logon Information section,
- In the User Name box, type your SkyConnect user id.
- In the Password box, type your password associated with the account.
- Using Mithi SkyConnect trial account?
- Use the User Id received in the Welcome Mail and Password provided by the Mithi team.
- Drag the Mail to keep offline slider to the desired number of months or to All to synchronize all email messages..
- Click the More Settings button.
- Provide Internet email settings.
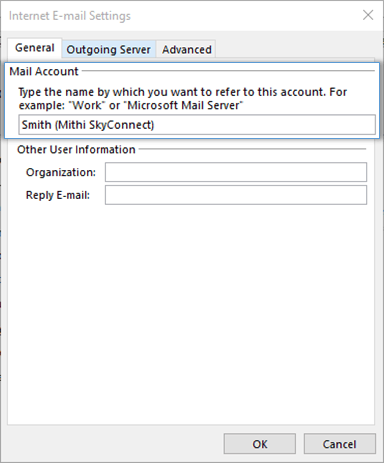
- On the General tab, enter name of the account for your reference.

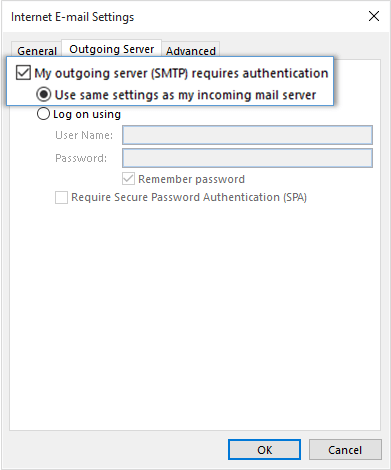
- Select the Outgoing Server tab.
- Enable the SMTP authentication by selecting the My outgoing server (SMTP) requires authentication check-box.
- Choose the option to Use the same settings as my incoming mail server.

- Select the Advanced tab.
- Enter Server port numbers and their type of connection to the server as given below
- Incoming Server (IMAP): 993
- Type of encrypted connection to the incoming server: SSL
- Outgoing Server (SMTP) : 465
- Type of encrypted connection to the outgoing server: SSL
- Set the Root folder path to INBOX
- Select the option Do not save the copies of sent items
- Click OK to close the Internet Email Settings dialog box.
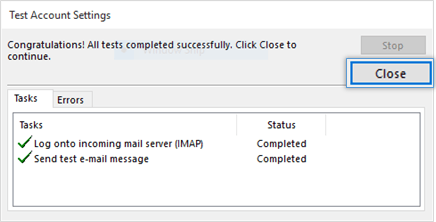
- On the Account Setup dialog box, click Next to proceed.
- Outlook verifies the settings provided. On completing the tests successfully, Close the test status dialog box and click Next to continue.

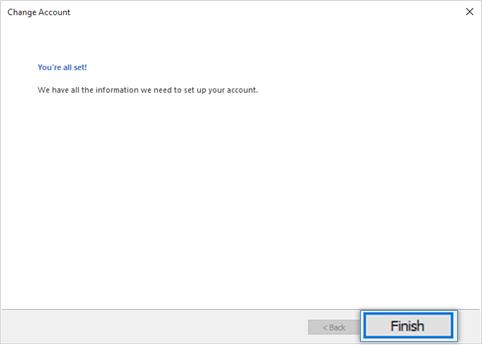
- Click Finish to complete the setup.
- On the General tab, enter name of the account for your reference.
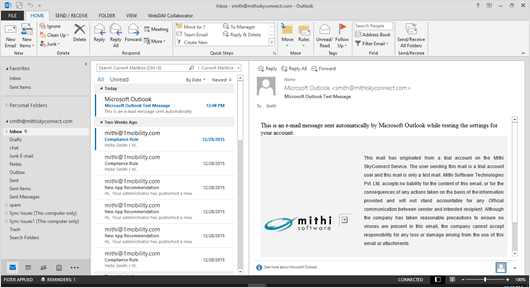
- Outlook configures your account and displays the Inbox folder which holds all the mail received to your mailbox. You can find a copy of an email sent in the Sent Items folder of the desktop client which syncs automatically on the server.


Configure a POP email account in Outlook 2013
Step 1: Create an email account
- Start Outlook.
- On the File menu, choose the Info tab and click the Add Account button.

- Choose the Manual setup or additional server types option to provide custom settings. Click Next to continue.

- Choose the POP or IMAP option as the type of account to be configured.


Step 2: Provide Account Details
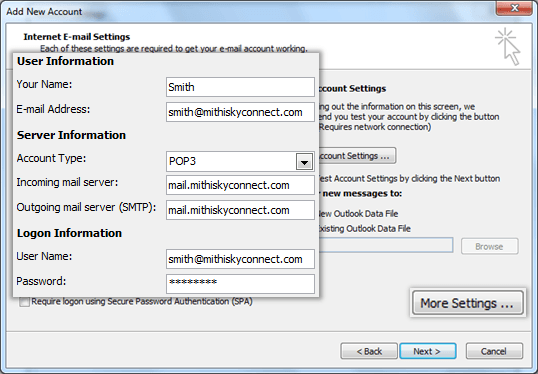
- In the User Information section, provide below details.
- In the Your Name box, enter your name exactly as you want it to appear to recipients.
- In the E-mail Address box, type your e-mail address.
- In the Server Information section,
- Select POP3 for Account Type.
- In the Incoming mail server box, type the name of your Server.
- In the Outgoing mail server (SMTP) box, type the name of your Outgoing/SMTP server.
Don't know your server name? Access the online help to know the server settings required to configure your account.
- In the Logon Information section,
- In the User Name box, type your SkyConnect user id.
- In the Password box, type your password associated with the account.
- Using Mithi SkyConnect trial account?
- Use the User Id received in the Welcome Mail and Password provided by the Mithi team.
- Drag the Mail to keep offline slider to the desired number of months or to All to synchronize all email messages..
- Click the More Settings button.
- Provide Internet email settings.
- On the General tab, enter name of the account for your reference.
- Select the Outgoing Server tab.
- Enable the SMTP authentication by selecting the My outgoing server (SMTP) requires authentication check-box.
- Choose the option to Use the same settings as my incoming mail server.
- Select the Advanced tab.
- Enter Server port numbers and their type of connection to the server as given below
- Incoming Server (POP3): 995
- Type of encrypted connection to the incoming server: SSL
- Outgoing Server (SMTP) : 465
- Type of encrypted connection to the outgoing server: SSL
- Click OK to close the Internet Email Settings dialog box.
- On the Account Setup dialog box, click Next to proceed.
- Outlook verifies the settings provided. On completing the tests successfully, Close the test status dialog box and click Next to continue.
- Click Finish to complete the setup.

- On the General tab, enter name of the account for your reference.
- Outlook configures your account and displays the Inbox folder which holds all the mail received to your mailbox. You can find a copy of an email sent in the Sent Items folder of the desktop client which syncs automatically on the server.


Set your default email account for sending new email
Refer to the steps mentioned here to set your default email account for sending new email