Configure an IMAP email in K9 Mail
Step 1: Install K9 Application
- You need to install the K9 Mail client from Google Play store on your mobile device.
- Launch the K9 Mail app from the Home screen.
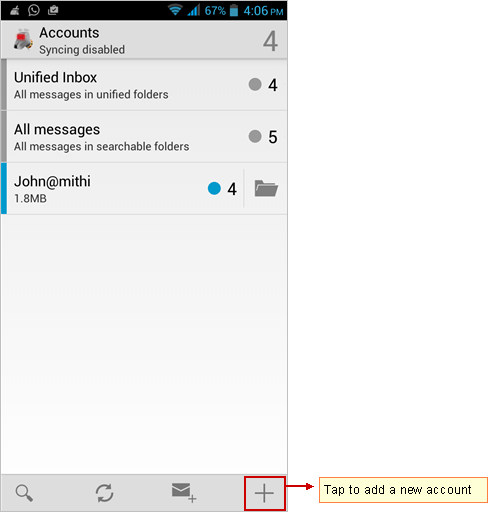
Step 2: Go to the Add Account screen
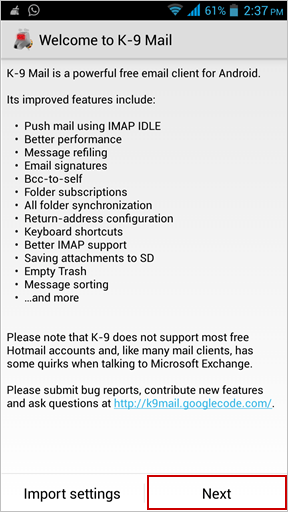
- When starting K-9 Mail for the first time, the Welcome screen displays to greet you. Tap Next to start the account creation wizard.

- Alternatively, to set up an additional mail account,
- Go to the Home Screen and tap K-9 mail icon.
- Press the Menu button and then tap Add account which displays Set up a new account screen.

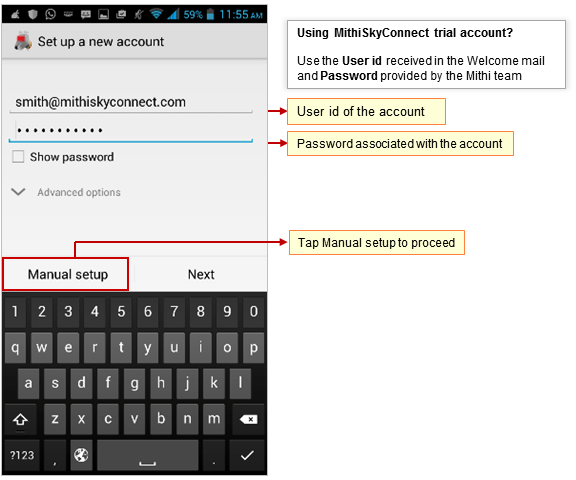
Step 3: Provide User Information
On the Set up a new account screen, enter the following information
- User id: Provide User id of the account If you are using Mithi SkyConnect Trial account, provide user id which you have received in the Welcome Mail.
- Password: Provide Password associated with the account If you are using Mithi SkyConnect Trial account, provide Password which you have received in the mail by the Mithi Team.TIP : If you change the password in the future, an authentication error occurs. Application fails to connect and fetch emails from the server.
- Tap Manual setup button to provide your account settings.

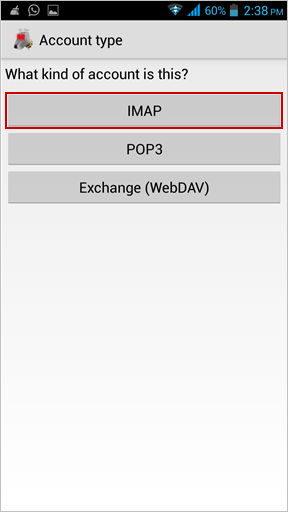
Step 4: Choose account type
- Select the IMAP option as the type of an email account you need to configure.

Step 5: Provide Incoming Server Settings
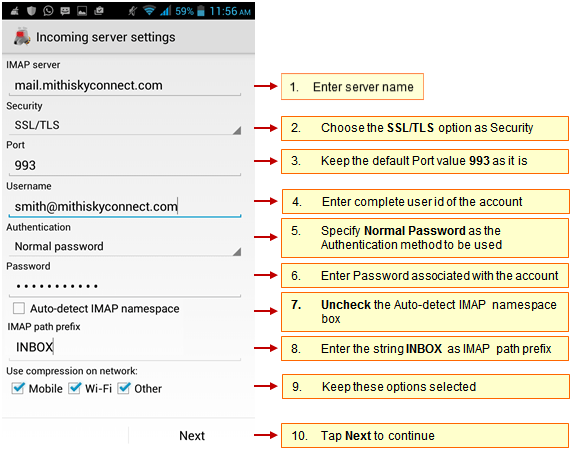
- IMAP Server: Enter server name
Don't know your server name? Access the online help to know the server settings required to configure your account.
- Security : Select SSL/TLS to connect your email account
- Port : Keep the default server port number 993 as it is
- User name: Enter complete email address of your account
- Authentication Type: Specify Normal Password as the authentication method to be used
- Password: Password entered on the Account Information screen populates here.
- Uncheck the Auto-detect IMAP namespace box
- Enter the string INBOX (in capital) in the IMAP path prefix box
- Keep the Use compression on network options selected.
- Tap Next to continue.
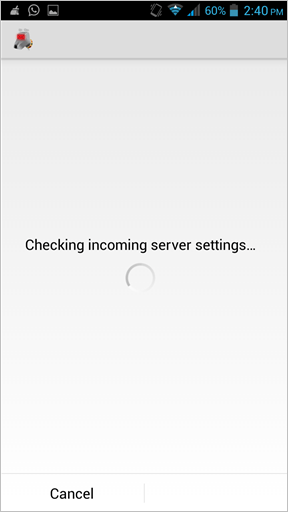
- K-9 Mail tries to connect to the server and verifies the incoming server settings.
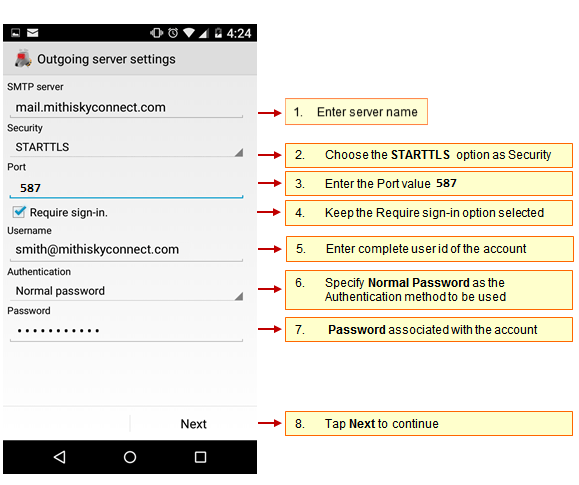
Step 6: Provide Outgoing Server Settings
On the Outgoing Server Settings screen, provide your SMTP server details.
- SMTP server : Provide server name.
Don't know your server name? Access the online help to know the server settings required to configure your account.
- Security : Choose the STARTTLS option.
- Port : Enter the value 587.
- Keep the Require Sign-in option selected.
- User name & Password: User name and password provided on the Account Setup screen populates here Do not change the values for these fields.
- Tap Next to proceed.
- K-9 Mail tries to connect to the server and verifies the outgoing server settings. After verification Account options screen opens.

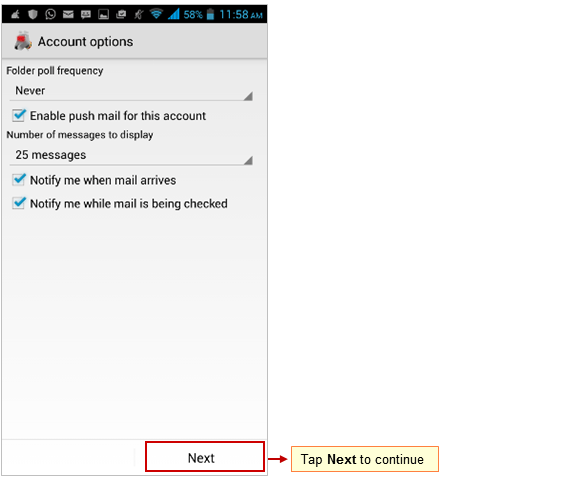
Step 7: Customize the account settings and finish the configuration
- Then, on the Account options screen, you can configure basic settings for the account and tap Next. These settings are specific to each account or mailbox you configure.Tip to save the battery life of your device: Choose the option so that Android will fetch the data less frequently. For example, if you choose to fetch data foe every 15 minutes, Android will wake up every 15 minutes for that. This could affect the battery life of the your mobile.
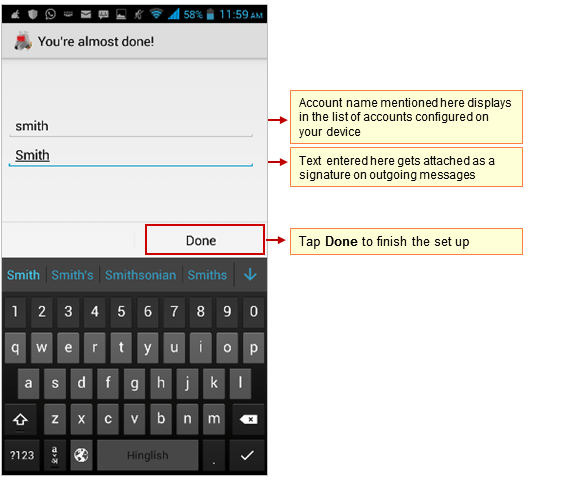
- Now, provide some additional account information,
- Give this account a name (optional): Enter name for the account which displays in the account list.
- Type your name: Enter the text that you want display as a signature on outgoing messages.
- To complete the setup, tap Done. K-9 saves and configures the mail account on your mobile.


Configure POP email account in K9 Mail app
Before configuring POP type of mail account, read the Difference between POP and IMAP type of accounts and their advantages and disadvantages.
Step 1: Install K9 Application
- You need to install the K9 Mail client from Google Play store on your mobile device.
- Launch the K9 Mail app from the Home screen.
Step 2: Go to the Add Account screen
- When starting K-9 Mail for the first time, the Welcome screen displays to greet you. Tap Next to start the account creation wizard.
- Alternatively, to set up an additional mail account,
- Go to the Home Screen and tap K-9 mail icon.
- Press the Menu button and then tap Add account which displays Set up a new account screen.


Step 3: Provide User Information
On the Set up a new account screen, enter the following information
- User id: Provide User id of the account If you are using Mithi SkyConnect Trial account, provide user id which you have received in the Welcome Mail.
- Password: Provide Password associated with the account If you are using Mithi SkyConnect Trial account, provide Password which you have received in the mail by the Mithi Team.TIP : If you change the password in the future, an authentication error occurs. Application fails to connect and fetch emails from the server.
- Tap Manual setup button to provide your account settings.
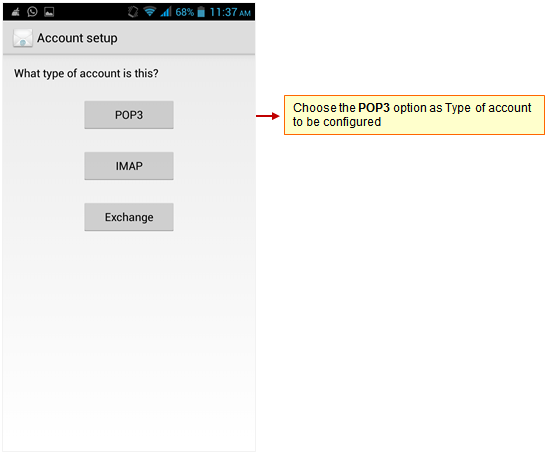
Step 4: Choose account type
- Select the POP option as the type of an email account you need to configure.

Step 5: Provide Incoming Server Settings
- POP Server: Enter POP3 server name
Don't know your server name? Access the online help to know the server settings required to configure your account.
- Security : Select SSL/TLS to connect your email account
- Port : Keep the default server port number 995 as it is
- User name: Enter complete email address of your account
- Authentication Type: Specify Normal Password, transmitted insecurely as a authentication method to use
- Password: Password entered on the Account Information screen populates here.
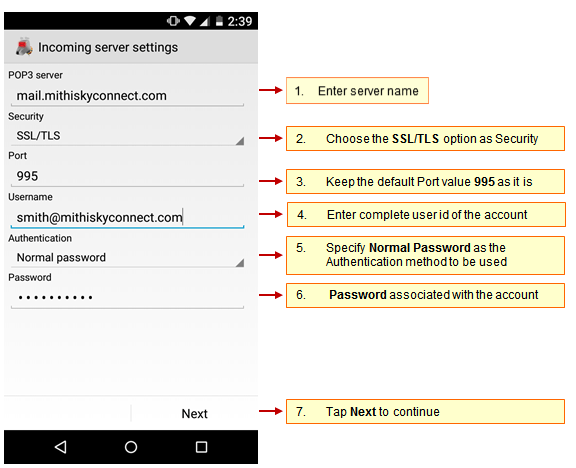
- K-9 Mail tries to connect to the server and verifies the incoming server settings.


Step 6: Provide Outgoing Server Settings
On the Outgoing Server Settings screen, provide your SMTP server details.
- SMTP server : Provide server name.
- Security : Choose the STARTTLS option.
- Port : Enter the value 587.
- Keep the Require Sign-in option selected.
- User name & Password: User name and password provided on the Account Setup screen populates here Do not change the values for these fields.
- Tap Next to proceed.
- K-9 Mail tries to connect to the server and verifies the outgoing server settings. After verification Account options screen opens.
Step 7: Customize the account settings and finish the configuration
- Then, on the Account options screen, you can configure basic settings for the account and tap Next. These settings are specific to each account or mailbox you configure.Tip to save the battery life of your device: Choose the option so that Android will fetch the data less frequently. For example, if you choose to fetch data foe every 15 minutes, Android will wake up every 15 minutes for that. This could affect the battery life of the your mobile.
- Now, provide some additional account information,
- Give this account a name (optional): Enter name for the account which displays in the account list.
- Type your name: Enter the text that you want display as a signature on outgoing messages.
- To complete the setup, tap Done. K-9 saves and configures the mail account on your mobile.


Manage your email account configured in K9 app
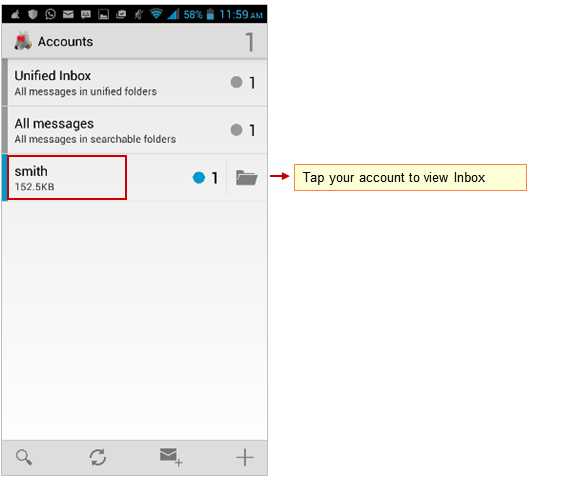
View emails
- Go to Home screen. Tap K-9 Mail icon then tap your account to view the Inbox.

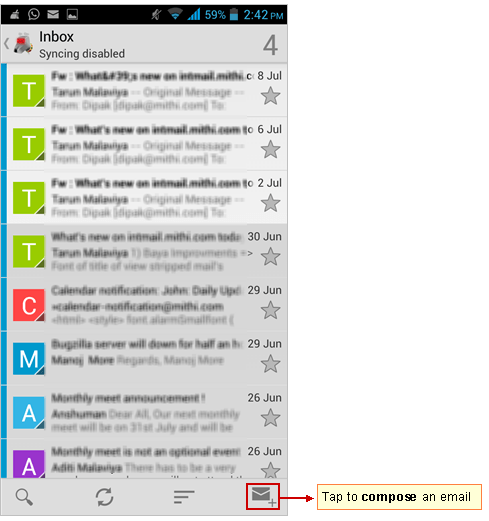
Composing an email
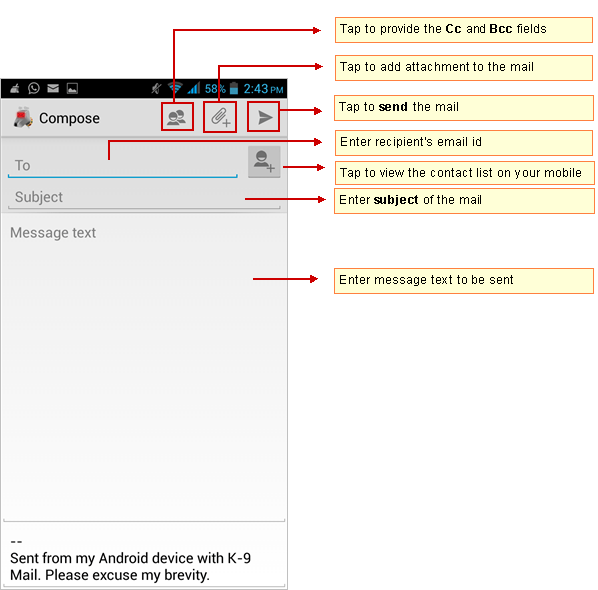
- Go to the Inbox folder. Tap the Compose icon.
- Compose your message add attachments to the message and send it to required recipients. Tapping the To/Cc/Bcc field, application displays a list contacts on your mobile. Choose the required contact from the list.Tips: To access all the shared/global contacts of your organization, configure an LDAP account on your android mobile. If required you can import your personal contacts to your mobile device. Find a copy of an email sent in the Sent folder of your device which is automatically synced to the Sent Items folder on the server. Can not find a copy of an email sent in the Sent Items folder?


Saving a copy of an email sent to the server
If you are using a POP type of account you need to save a copy of an email sent to the Sent Items folder on the server. To save sent mail in the Sent Items folder on the server:
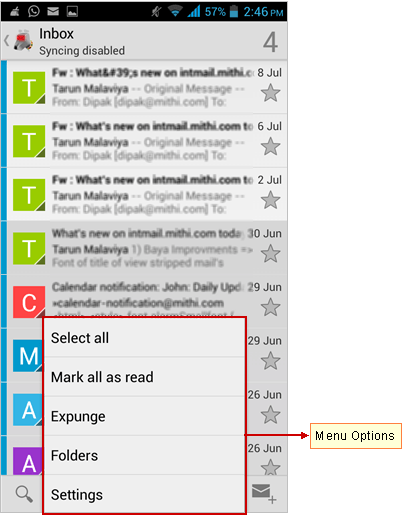
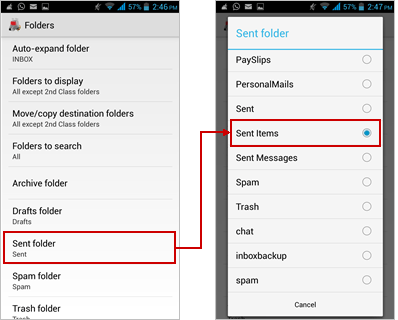
- Press the Menu key on your device to view options. Tap Settings => Account Settings => Folders which shows a list of folders.

- On the Folders screen, tap Sent folder and choose Sent Items folder. Press the Back key to exit.
 Note: To find more information on using K-9 mail visit: https://github.com/k9mail/k-9/wiki/Manual


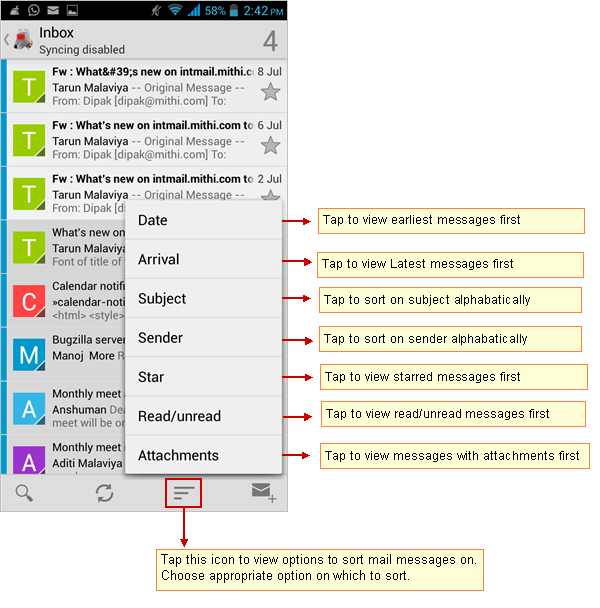
Sort emails
To sort your mailbox:
- Launch the K-9 Mail application and choose your account
- Tap sort messages icon to view options available
- Choose appropriate option on which to sort mail messages in the folder

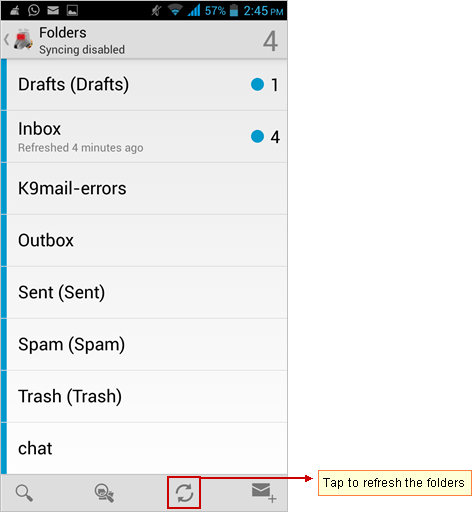
View IMAP Folders
Note: You can access all the IMAP folders on your mobile only If you have configured an IMAP type of account on your device.
- To view IMAP Folders:
- Press the Menu key to view all the menu options
- Tap Folders, to view all the IMAP folders present on the server.
- To refresh all the folders:
- Tap Refresh icon to sync the folders.
- Note: You can decide which folders (First Class/ Second Class/ All) you want to sync on refreshing the folders. To change a folder's class, long-press on the folder and select Folder settings.Refer the topic How to use K-9's folder class system?


Update the password
- Press the Menu key on your device to view options. Tap Settings => Account Settings => Folders which shows a list of folders.
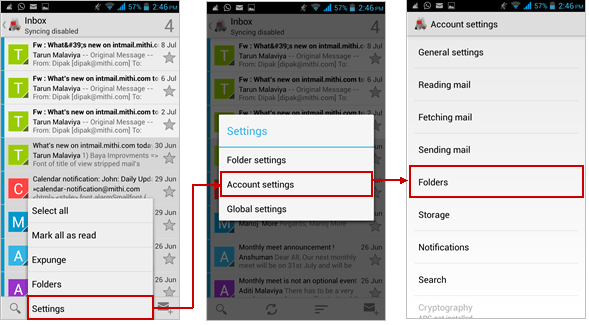
- On the Folders screen, tap Sent folder and choose Sent Items folder. Press the Back key to exit.
 Note: To find more information on using K-9 mail visit: https://github.com/k9mail/k-9/wiki/Manual


Remove the account
- Launch the K9 mail application and go to the Accounts screen.
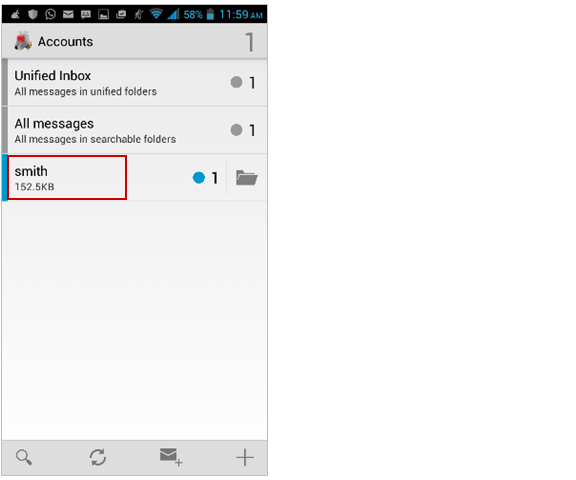
- Tap and hold the account to be removed from your device.
- Tap the Remove Account option from the list


- Press the Menu key on your device to view options.
- Tap Settings then Account Settings