Overview
The access to Ideolve accounts and the security of the data uploaded to Ideolve is controlled at three levels:
Settings at these levels allow you to control features such as workspace creation, note creation, workspace invitations, and more.
The settings available at each level are as given below:
Organization level controls


List of controls
- Workspace creation: Using this control, you can decide which users are allowed to create workspaces.
- LDAP address lookup configuration: This configuration allows workspace owners to lookup the LDAP server for auto-completion of email ids when sending out invites to join a workspace.
- Mobile access: This option controls the access of Ideolve accounts from Ideolve mobile clients.
Setting the Control values
- Login to Ideolve using the primary contact id.
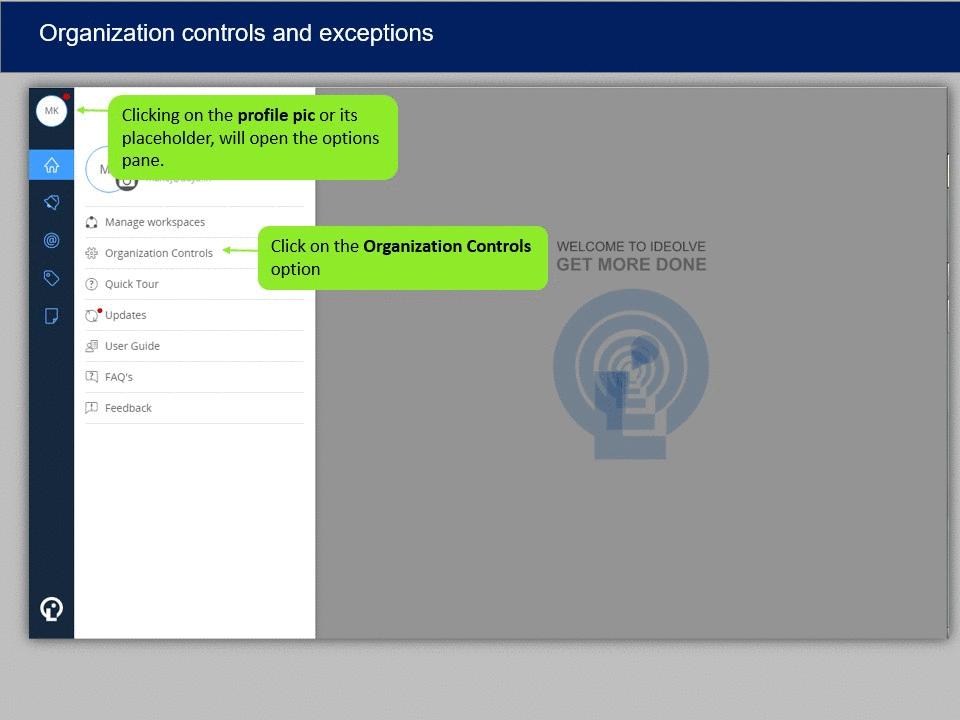
- On the top of the Application bar, click the Profile photo to open the options pane.
- Select Organization Controls.
- Under the Controls tab, select or un-select options to update the defaults.
- Click on Save.
Adding exceptions
- Login to Ideolve using the primary contact id.
- On the top of the Application bar, click the Profile photo to open the options pane.
- Select Organization Controls.
- Go to the User Exceptions tab.
- Click on the Add button.
- Click on Select policy holder and start typing the display name of the user. The system shows you all the users matching your text. Select the user from the drop-down list.
- Click on the tick mark next to the display name.
- The name gets added to the exception list.
-
Hover over the newly added user and click on Edit.
-
Update the settings.
- Click on Save.
Example of Organization Controls
If in your organization, only the primary contact is allowed to add workspaces, the Control value and exception is defined as follows:
- In the Controls tab, Workspace Creation is Off
- In the User Exceptions tab, there is an exception defined for the primary contact, where the Workspace Creation is On.
Workspace level controls


List of Controls
- Create notes: Users belonging to a workspace are allowed to create notes in the workspace.
- Invite external users: Users belonging to a workspace are allowed to invite users not belonging to their domain.
- Post comments directly to Freshdesk: Comments in the workspaces that have this option enabled, display a "Post to Freshdesk" action that allows users to push comments directly to Freshdesk.
- Publish note: Users belonging to a workspace are allowed to publish notes owned by them or to which they have publish permissions.
Changing controls for a workspace
- Login to Ideolve.
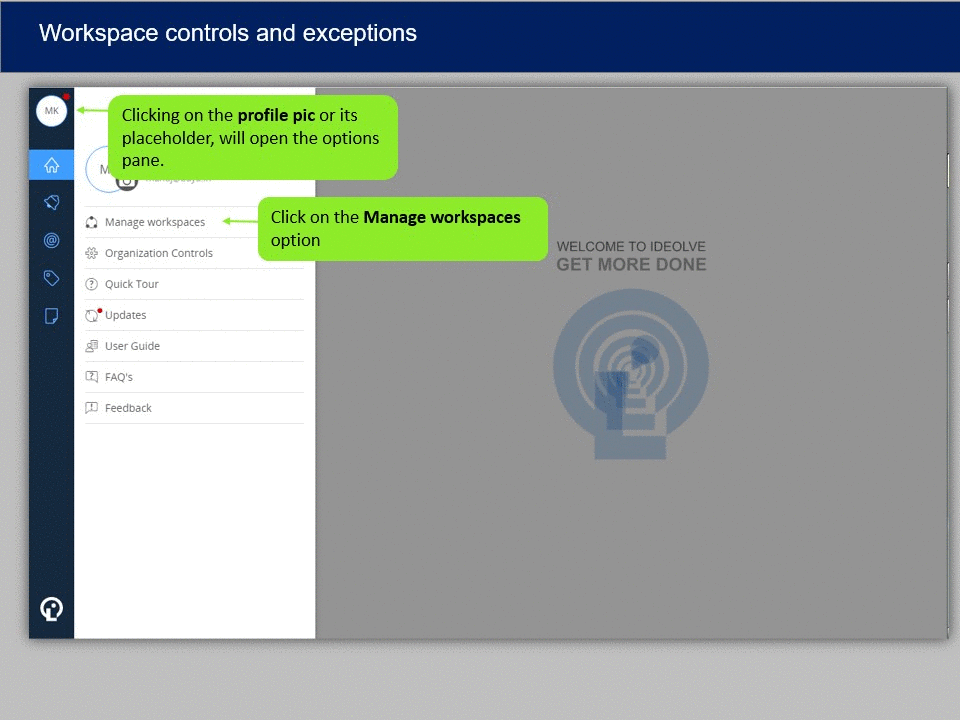
- On the top of the Application bar, click the Profile photo to option the options pane.
- Select Manage Workspaces.
- You see the workspaces created by you and the ones which you have joined.
- Hover over the name of the workspace created by you.
- Hover over the option depicted by three vertical dots.
- Select Admin Controls from the drop-down list.
- To set the workspace default, go to the Controls tab.
- Update the settings.
- Click Save to update the defaults for the workspace.
Adding exceptions within a workspace
- Login to Ideolve.
- On the top of the Application bar, click the Profile photo to option the options pane.
- Select Manage Workspaces.
- You see the workspaces created by you and the ones which you have joined.
- Hover over the name of the workspace created by you.
- Hover over the option depicted by three vertical dots.
- Select Admin Controls from the drop-down list.
- Go to the User Exceptions tab.
- Click on the Add button.
- Click on Select policy holder and start typing the display name of the user. The system shows you all the users matching your text. Select the user from the drop-down list.
- Click on the tick mark next to the display name.
- The name gets added to the exception list.
- Hover over the newly added user and click on Edit.
- Update the settings.
- Click on Save.
Examples of Workspace controls
If in a workspace, there is a single note creator and other members can only comment on existing notes, then the controls and the exceptions will look as follows:
- In the Admin Controls option under Organization, the Create Notes option under Default Workspace Controls is On.
- With the workspace, in the Controls tab of the Admin Controls, Create Notes is Off.
- With the workspace, in the User Exceptions tab of the Admin Controls, there is an exception defined for the user who can create notes, where the Create Notes is On.
Note level controls

List of Controls
- Export note: Users associated with the note are allowed to export the note content
- Create comments: Users associated with the note are allowed to post comments.
- Edit comment: Users associated with the note are allowed to edit the comments posted by them.
- Delete comment: Users associated with the note are allowed to delete the comment posted by them.
- Copy content: Users with whom the note is shared and the viewers of a published note are allowed to copy the content of the note and the comments.
- Download files: Users associated with the note are allowed to download the attached files.
- Download files when the note is published: Viewers of the published note are allowed to download attachments
Changing controls of a note
- Login to Ideolve
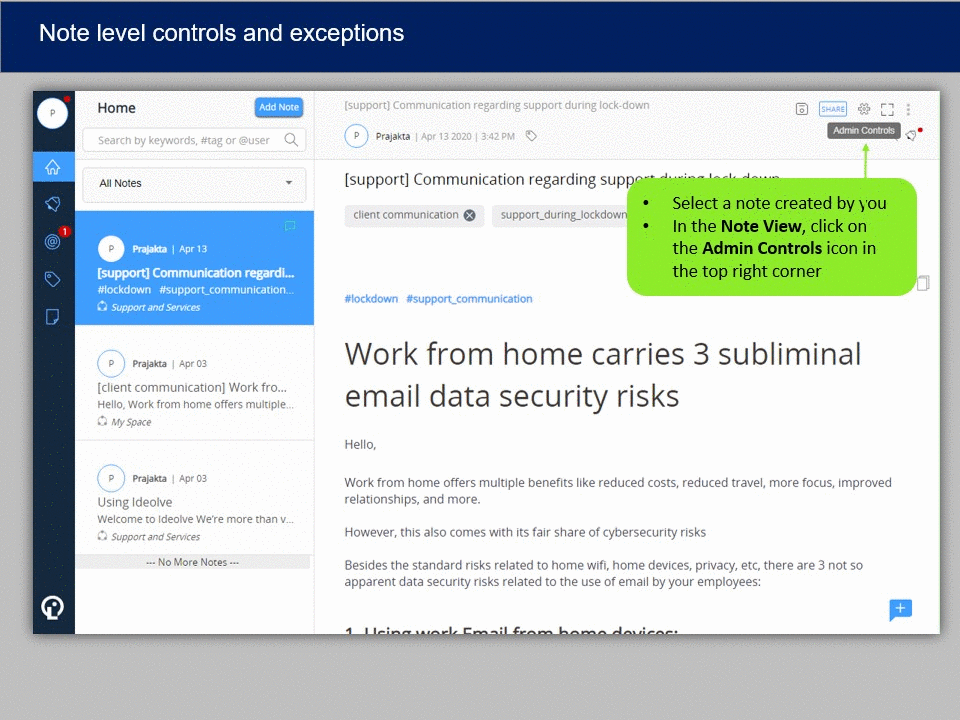
- Select a note created by you.
- In the Note View, click on the Admin Controls icon in the top right corner.
- Go to the Controls tab.
- Update the settings.
- Click on Save.
Adding exceptions within a note
- Login to Ideolve.
- Select a note created by you.
- In the Note View, click on the Admin Controls icon in the top right corner.
- Go to the User Exceptions tab.
- Click on the Add button.
- Click on Select policy holder and start typing the display name of the user. The system shows you all the users matching your text. Select the user from the drop-down list.
- Click on the tick mark next to the display name.
- The name gets entered into the exception list.
- Hover over the newly added user and click on Edit.
- Update the settings.
- Click on Save.
Examples of Note Controls
If you are the workspace owner and want to ensure that no one can export any note in the workspace, then set the workspace default for Export Notes as Off.
Updating the default controls
Setting the default controls for all workspaces in the organization


An organization owner or the primary contact in an organization can override the controls and exceptions defined in individual workspaces by changing the defaults. If any control is Off at the organization level, then it overrides all the control and exceptions within the workspaces. It is recommended to keep all the Controls On at this level.
- Login to Ideolve using the primary contact id.
- On the top of the Application bar, click the Profile photo to open the options pane.
- Select Organization Controls.
- Go to the Default Workspace Controls tab.
- Update the defaults.
- Click on Save.
Setting the default controls for all notes in a workspace


A workspace owner can update the defaults note level controls for all notes within the workspace. The defaults override any settings made at individual note levels.
- Login to Ideolve.
- On the top of the Application bar, click the Profile photo to option the options pane.
- Select Manage Workspaces.
- You see the workspaces created by you and the ones which you have joined.
- Hover over the name of the workspace created by you.
- Hover over the option depicted by three vertical dots.
- Select Admin Controls from the drop-down list.
- Go to the Default Note Controls tab.
- Set the default settings.
- Click Save.